How to draw a palm tree: Awesome easy-to-use drawing tutorial 2024

How to draw a palm tree_featured image

Welcome to my how to draw a palm tree tutorial!

Hi!

Welcome to another article in my how-to-draw series. This article is all about palm trees and how to draw them! If you want to add more beach and “fun in the sun” feel to the ocean and sand of your art, draw palm trees! A simple palm tree, coconuts, and some tropical fruit can create moods for your drawing that say “vacation and Mai Tais” or “building sandcastles with the kids.”

As you go through this article, you may notice that I’ve changed my format a little bit this time by leaving out the lighting (shadow and light) part. I’ll clarify that choice toward the end here, but, first, let’s focus on learning how to draw a palm tree!

Once you learn to draw a palm tree with all its parts and detail–from the silhouette to the curved lines of the tree trunk, and the round crown to a palm tree’s leaves–you can render your finished drawing however you choose: realistic, cartoon, anime. You’ll be covered by what you learn how to draw here!

First, we explore and study all the shapes and forms that make a palm tree look like a palm tree. Then, we’ll start constructing the basic shapes and forms, move into practicing with palm tree silhouettes, dig into some step-by-step palm tree drawing tutorials, and draw a palm tree in perspective.

I’ll cover the basic shapes, forms, & silhouettes of palm trees and all their parts, including the palm tree trunk and palm tree leaf. Our first step is the same as always: references!

Let’s learn about palm trees!

Palms, including palm trees, are from the family Arecaceae. They are a family of flowering plants with several growth forms, all commonly known as palms.

Most palm species, characterized by large evergreen leaves called fronds, are found in tropical and subtropical environments.

As one of the best known and most cultivated plant families, palms show extensive diversity in physical characteristics that allow them to inhabit nearly every kind of habitat. Being so well cultivated means palms, from their wood to their fruits, have several uses in human society, including palm wood, carnauba wax, palm syrup, dates, oils, jelly, and coconut products.

Exploration and study: Discovering a palm tree’s basic shape

Study sketches help us build our design process. In this step, we must take the time to understand the “thing” we’re drawing. Without this step–or without spending enough time with this step–drawings and designs will likely fall flat.

Since we’re not interested in polishing turds, let’s learn about the shapes and forms that make a palm tree!

Shape breakouts and natural variations

Palm trees have fairly basic overall shapes. To begin an amazing palm tree drawing, choose a few simple shapes and forms.

I started outlining the basic shape breakdowns first because it communicates our goal in this step more clearly. However, it’s important to note that exploration doesn’t start with the shape breakdown sketch you see above; it starts with a messy and thorough exploration of your subject with all its parts and variations.

Here are my exploration study sketches:

First, I explored all the parts of the palm tree: palm leaves, the palm tree trunk, the different directions of the fronds, and individual leaf construction information for several types of palm leaves.

The challenge and complexity arise when it’s time to draw all the details and textures–a lot of small and irregular shape details– that give palm trees that recognizable feel and character.

My hope and encouragement for you are that you don’t forget or skip the exploration drawings stage before jumping straight into the palm tree step by step tutorials coming up.

Trust me, your step-by-step practice will level up much further the more you study palm trees through sketching exploration.

How to draw a palm tree: form construction

Completing our palm tree exploration sketches gave us a decent grasp of the parts of the palm tree. We have a solid idea of the lines, outline, silhouette, and edges that we need to create our own palm tree drawing.

Our study into how to draw a palm tree allowed us to wrap our minds around where we need to be drawing curved lines vs. horizontal lines or a straight line and showed us which basic shapes and forms we have to work with.

As we continue to learn how to draw a palm tree, let’s jump into practicing the tree’s form construction.

The bulk of form construction on a palm tree lies in drawing the trunk while drawing a palm leaf–called a frond–calls for drawing slightly curved planes without much volume apart from the palm frond base.

Most of the trunk is a simple long cylinder, but the portion at the top that resembles a fat cylindrical drum (and sits between the leaves and the trunk) has much more volume and thickness from the forms of dozens and dozens of pruned/shaved fronds.

If you could use more help with drawing forms, please check out my Form in Art and Art Fundamentals for Beginners articles.

A word about research…

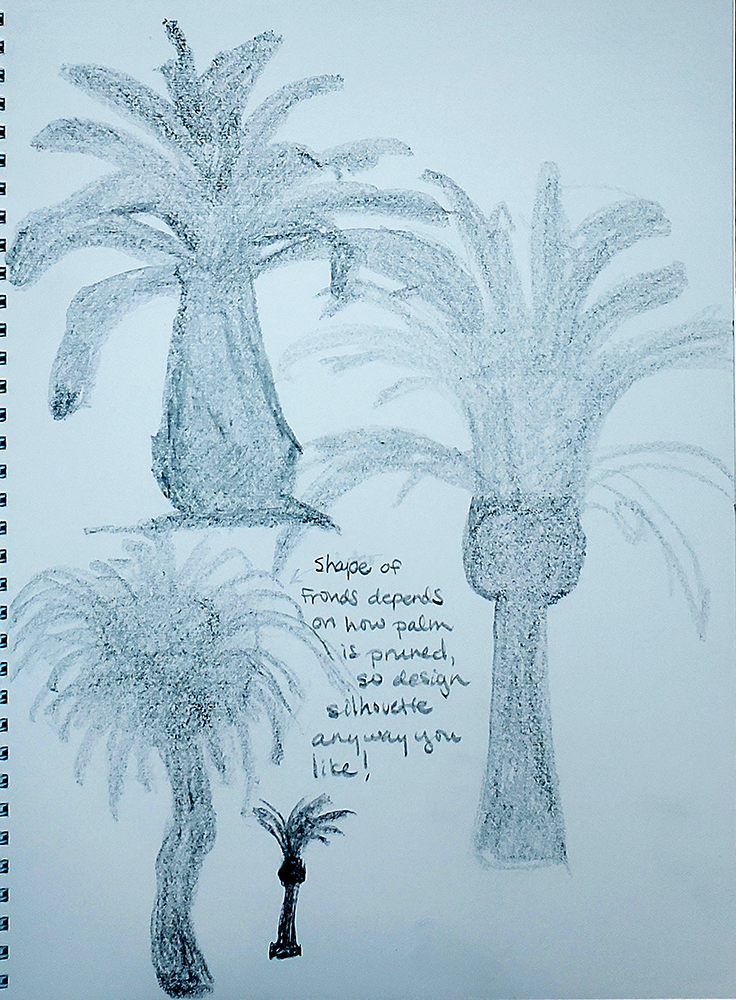
Looking up palm tree drawings or palm trees on Google images gives the impression that most palm trees are just long and skinny with a few floppy fronds and a sprinkling of coconuts. This impression is mostly true of young palm trees or palm trees that have been more heavily pruned through shaving.

To learn how to draw a palm tree, I took a look at how trees get that shaved, skinnier look:

Here’s what I see around my neighborhood:

The point I’m trying to make here is: Always do your research and then find the best references you can because a basic search will only get you what everyone else has drawn, and that’s never the whole story of all that’s available for your designs.

Palm tree silhouette

I mentioned at beginning of this tutorial that I’d changed my format a bit for this article, and here’s why:

When you start exploring palm tree drawing (or any tree…or hair…or fur…really any highly textured thing, you get the idea ???), it quickly becomes clear that drawing the leaves of a palm tree one at a time is a huge pain in the butt!

The studies alone that I drew showed me the last thing I wanted to do was draw the fronds one at a time. So, when the shapes are small or many and squished or layered, what tip can we use to save us pulling out our hair? Introducing, Silhouettes!

How to draw a palm tree with silhouette, step-by-step tutorial

There isn’t one right way to draw silhouettes. What I’m showing below is only one way to approach it. Please approach this in the most intuitive way for your drawing process.

Here are a few I drew by hand during my exploration stage.

Drawing with silhouettes helps us visualize our overall subject and its gesture without allowing us to get bogged down in details.

Since most of what we see of trees is their general silhouette and light effects on their shapes and forms (small shapes make textures!), using silhouettes to draw palm trees gets us further along without all the hair-pulling ?.

Once we’ve experimented with a few silhouettes (they should totally be messy, not precious at this stage!) and chosen what we like, we can flesh out the internal shape and form information by drawing over our palm tree silhouette.

Palm tree silhouette draw over, step by step

To do this digitally as I have:

  1. Create a new layer over your silhouette and fill it completely with white, and then lower its opacity until you can clearly see your palm tree drawing silhouette enough to draw and trace over it.
  2. Create another new layer on top of your white trace layer and begin sketching the internal shape information over the top of your silhouette, including texture information.
  3. Use as many layers as you’d like to experiment with as many interior shape designs as you can. Simply hide the layers of your other design iterations to help you focus on the current layer’s work.

If you started traditionally on paper, you can also complete this step by photographing/scanning your drawing for your base palm tree drawing layer and then follow the steps above.

To do this traditionally:

  1. Get some tracing paper and overlay it onto your drawing.
  2. Begin sketching the internal shape information over your drawing onto the tracing paper. I recommend using pencils for this so you can easily make changes as you sketch. It’s also fun and useful to have multiple pieces of tracing paper for trying different interior shape designs.

A light box, if you have one available, is also a useful tool for this step when you’re working traditionally. Here are a couple of options from Blick & Amazon.

I found this to be one of the most interesting and enjoyable steps for how to draw a palm tree, and I encourage you to work loosely and have a blast with it.

Easy steps palm tree drawing

Now, we come to the how to draw a palm tree step by step parts of this tutorial. This is the easiest version of this tutorial. I plan to create a more advanced and involved version in the future.

how to draw a palm tree_step by step-thumbnails

Step 1

Since the planes and lines of a palm tree can get overwhelming quickly, I break the drawing process down into lots of digestible steps.

First, choose the simple shapes you want for your leaves and trunk and create a simple silhouette as shown here.

If you want to add some fruits, like coconuts, now is a good time to add their shapes as well.

Step 2

Next, we begin to construct the forms from our thumbnail.

Here I drew the middle “drum-like” part that sits between the fronds and the trunk.

how to draw a palm tree_step by step 01
how to draw a palm tree_step by step 04

Step 3

Draw the long trunk attached to the “drum-like” part.

Step 4

Draw the overall container or “envelope” shape you want for the palm tree leaves. This step helps you begin blocking in the gesture and direction of your leaves.

how to draw a palm tree_step by step 05
how to draw a palm tree_step by step 06

Step 5

Overlay the palm leaf gesture lines onto your envelope shape. This gesture line step helps you place the tree’s leaves in the position and direction you want them.

Step 6

On top of the gesture lines from the last step, draw your leaf shapes.

how to draw a palm tree_step by step 07
how to draw a palm tree_step by step 08

Step 7

Begin adding texture details to your leaves by using lines to “cut” into the edges/contours of each leaf.

Step 8

Next, I added simplified oval shapes to represent the shaved/pruned fronds on the “drum-like” part of the tree.

More texture adds to the palm tree feel of the drawing.

how to draw a palm tree_step by step 09
how to draw a palm tree_step by step 10

Step 9

Almost done!

Before cleanup, add some texture to the trunk.

The highly textured feel of a palm tree trunk comes from lots of frond leaves that were pruned/shaved as the tree grew.

Final Step

Once you clean up your lines and edges, erasing where there is some overlap of shapes and lines you don’t need, you’ll be all done!

how to draw a palm tree_step by step - Final

Palm tree drawing in Perspective

Knowing how to draw a palm tree in perspective is useful for placing your trees in any scene you want. Below is a quick visual demo for drawing palm trees in two-point perspective.

Color and light and palm trees

I know there’s a lot more to cover to help you understand how to add color and light to a palm tree, but that’s a whole other discussion trust me. I will write another article to cover the color and light area on its own so it’s not confusing ?.

In the meantime, if you’d like to add some light to your tree, please try out my Fundamentals of Light article. It will help you get started with the basics of light and shadow in art.

More details and coloring of palm trees

Without getting into the weeds too much, I thought it would be useful to do a quick visual once over of the textural details palm trees possess.

Here you’ll get an idea of the other textures and some very useful references for your drawing! For quick color experiments, I recommend using colored pencils or pastels.

FULL DISCLOSURE: I do not own these images! I found them on Google Images under the “Creative and Commons” usage rights filter.

Palm tree trunk dissection reference

Palm tree trunk texture reference

Palm fruit reference

Fond wishes and a warm farewell until next time!

I hope you found this to be one of those easy drawing tutorials, and I hope the art and explanations here have helped you digest the more difficult aspects of how to draw palm trees.

Thank you for spending part of your day with me learning how to draw a palm tree! I appreciate you stopping by, and I’d love to hear your feedback. If you have any questions or ideas for improving this article, please leave them for me in the comments below.

Stay safe, and Happy Drawing!


How to draw a sphere: A flexible approach to a valuable form, 2024

How to draw a sphere

Welcome to how to draw a sphere!

Hello and welcome fellow artists!

Thank you for visiting this article on my site to learn how to draw a sphere!

I’ll go step-by-step through a few methods for sphere drawing, and most of them focus on drawing spheres not lighting spheres. There’s a distinct difference between drawing forms and adding light and shadow to them.

Drawing solid forms should always come first, then light source, shadows, highlights, etc can come into your picture plane. The goal is to have a solid drawing first, with form space you understand. This makes adding light and shadow so much easier.

I don’t shoot for perfect spheres in all of my examples because there are lots of sphere-like or ovoid forms whose drawing process is nearly identical to spheres. These sphere-like forms are basically variations of a sphere, and it helps to know how to construct those as well.

Let’s dig in! We’ll start by looking at what defines a sphere.

Learning about spheres: The technical stuff and gubbins

Don’t worry, I won’t get too mathematical on you, I promise.

Just as every point on a circle is equidistant from its center, so it is with a sphere. The major difference is a sphere is a three-dimensional form, while a circle is a two-dimensional shape. Shapes, edges, and vertices, and depth create forms, which we also call objects.

So, a sphere is a geometric three-dimensional form whose surface is composed of points that are all equidistant from its center. In general, we use the terms sphere and ball interchangeably, and that’s fine.

Exploration and study: Natural and man-made spheres

We need reference photo materials! We all know what a ball, sphere, sphere-like, and ovoid forms look like, so the value of a reference photo here isn’t really for learning how to draw a sphere. Its value is as a source of inspiration. After learning how to draw a sphere, we’ll want to add surface texture and light–which is where the reference photos come in handy.

Shape breakouts and natural variations

Most objects we see in day-to-day life are spherical or spheroid. That means things like apples, oranges, grapes, water droplets, the human skull, etc are three-dimensional forms that are round, or more or less round. They are not perfect spheres, but they’re visually close enough to be referred to as spheres or spherical.

Here’s a reference board for spherical/spheroid and ovoid objects:

How to draw a sphere step-by-step tutorials

There are three methods I’ll cover here that are strictly drawing only–meaning no tonal value, or light and shade, is used to create the spheres. The first two methods demonstrate how to draw freehand spheres, while the third covers sphere drawing in perspective.

The fourth method I’ll cover here goes step-by-step through how to draw a sphere using light and shadow, both digitally and using graphite. I will demonstrate how to add a light source, form shadow, mid-tone (or half tone), a core shadow, a cast shadow, and a highlight to a flat circle shape to model a sphere. I’ll also demonstrate cast shadow placement using the angle of the light rays from the light source.

In this first method, we’ll draw a sphere by using ellipses to add the illusion of depth to a flat circle shape.

how to draw a sphere_depth with ellipses method 01

Step One

Draw a circle of any size you like, and try to make it as round as you can.

Step Two

Draw horizontal ellipses within your circle. The band of each ellipse should look and feel like it’s wrapping around the surface of the sphere you’re creating.

This feeling of a contour line wrapping around a form is what ultimately gives our sphere drawing a sense of three-dimensional depth on our picture plane (paper).

how to draw a sphere_depth with ellipses method 02
how to draw a sphere_depth with ellipses method 03

Step Three

Next, repeat the same process from step 2 with vertical ellipses wrapping around the sphere from top to bottom.

Quick Tip!

The way your ellipses wrap around the edges, or outline, of the circle you started with, is very important.

The illusion of depth is created by giving the viewer the feeling the contour lines are wrapping around the form. This creates a sense of depth because it shows plane changes/turns on the form.

2D forms have no depth, so they have no plane changes to indicate a presence in 3D space. Plane changes are the realm of three dimensions.

how to draw a sphere_depth with ellipses method 04
how to draw a sphere_depth with ellipses method 05

Step Four

Once you’re happy with the sense of depth created by your ellipses, begin darkening the contour lines on the front-facing side of your sphere.

Darkening the contours on the front side, while leaving those in the back lighter, will add a greater sense of depth through value. Darker tones appear to come forward, while lighter tones appear to recede into the background.

To make this process as clear as possible, I created a video to demo the sphere drawing process for this method.

Another method for how to draw a sphere more or less does away with using a circle shape as a starting guide. I don’t find this next method as intuitive or helpful as the method above, but it is another option to consider. It begins with ellipses instead of a circle.

How to draw a sphere: Form dissection

I created the next few videos to demonstrate the form dissection part of how to draw a sphere. When we need to draw something broken, split open, cut up, etc., visual dissection drawing skills come in handy. It’s also useful for investigating and drawing internal shapes and forms, like the juicy insides of a sliced orange or the bloody bits of a battle wound or a sliced-off limb.

The most important thing to remember about the dissection of any form is to do it along believable contour lines, even if you’re not going for a clean look.

Getting a crescent shape from spheres.

Sphere drawing in Perspective

If you’ve visited any of my other how-to-draw articles, first of all, Thank you!

Second, you will have noticed that part of the way I craft these lessons is to demonstrate how to draw the subject in perspective. Perspective drawing is one of the fundamental drawing skills, so I give it a shout-out in each of these articles.

Next, I’ve created a video to demonstrate how some of the process for how to draw a sphere in perspective. As you’ll see in the video, the process is simple but requires quite a bit of repetition.

Below are some images from the video to act as another reference for how to draw a sphere in perspective.

How to draw a sphere with Light and shadow

The first thing to know about how to draw a sphere with light and shadow is that there isn’t a lot of drawing involved, per se.

I consider drawing to be the use of line marks and segments, shapes, forms, etc., which is a bit different than adding value/tones through shading. I think of light and shadow more like painting and coloring, which is why I’m not terribly fond of covering them in how to draw articles. I’m always concerned that it will cause confusion, but it is all connected so we gotta get into it at least a little.

Please try to bear in mind, for how to draw a sphere and anything else you draw, that you always want a solid drawing with solid forms first. Light and shadow, tones and shade, and color and paint all come after you have solid forms.

Okay, I promise I’m done ranting about it. For now ?.

Know your light source

When you’re comfortable with how to draw a sphere, the next step is to add a light source to create light, shade, shadows, and the other values and tones.

First things first, you must know a few things about your light source.

Without diving into the Fundamentals of Light, the four things you must know (or invent and decide on) about your light source are its angle in relation to your object, its height, its color/temperature, and its intensity.

To help you practice, I recommend keeping it simple so there are fewer variables to juggle. I suggest sticking to black and white for now and using a simple light of average intensity. That leaves the height and angle of your light source to play and experiment with.

Here are a few references to help with visualizing your light source.

Form shadow and cast shadows

When lit, all forms will have at least three shadows: a form shadow, a cast shadow, and an occlusion shadow. Of course, in reality, the tones/values are much more involved than that.

Here are a few diagrams to illustrate most, if not all, of the areas and terminology involved in how to draw a sphere with light and shadow.

Lighting your sphere drawing step-by-step (digital)

Now that we’ve very roughly covered a few lighting basics, let’s dive into some demonstration. From experience, I believe the fundamentals of light are more easily practiced with digital tools–they’re much more forgiving. So, this example has been created in Photoshop.

Basic Light and Shadow Demo 01-plain circle

Step One

Start with a medium-size flat circle. It helps to use one with some tone rather than a white circle. Here I’ve used a mid-tone gray circle.

In the case of how to draw a sphere with light and shadow, we need to start with a toned flat circle and build the depth with light and shade. Normally, I would not start lighting without a form.

Step Two

We have a shape to add depth to, now it’s time to decide on the light source.

I chose to emulate the sun here, keeping the source up high, at about a 45-degree angle to the object, far away, and intense.

Basic Light and Shadow Demo 02-add light source and light guide
Basic Light and Shadow Demo 03-add center light

Step Three

With the light source set, let’s make the first rough light pass on the object.

The focus here is on determining where your sphere’s terminus/terminator will be by judging where the plane change happens–where the sphere would begin to turn away from the light.

Step Four

Now it’s time to get into the shade and shading part.

Light helps us see forms, while shade and shadow give us form definition.

In this step, select a dark grey (about 80-85%, or a 2b pencil to 4b pencil if you’re working traditionally) and begin blocking in the form shadow.

The form shadow will begin at the terminus/terminator and cover all parts of the form facing away from the light.

Basic Light and Shadow Demo 04-add form shadow-terminus-core shadow

This is also a good time to start blending in your halftone/mid-tone. The halftone/mid-tone area is where the form has started to turn away from the light but hasn’t turned enough to be in shadow. So, this area is roughly half the value of both the center light and form shadow combined.

It helps to remember these are all first passes. It will be necessary to go back over each area to darken, lighten, blend, and adjust as needed.

Basic Light and Shadow Demo 05-add cast shadow-occlusion shadow

Step Five

With your form shadow roughed in, it’s time to add your cast shadow.

The shape and angle of your cast shadow are determined by the shape of your form and the angle of your light source.

It’s okay you’re a little off at first. I’m pretty sure my example here is slightly off, but it works.

A written explanation gets confusing, so I’ll include a diagram for placing cast shadows after this step-by-step tutorial.

Learning how to draw a sphere with light and shadow is a really good exercise for learning about the other important shadows, like the core and occlusion shadows.

You’ll see in the diagrams from steps four and five that I’ve labeled the core shadow. The terminus/terminator is where the light no longer reaches and the form shadow begins. Right next to that is the core shadow, the darkest part of the form shadow.

Occlusion shadow areas are places where the light cannot reach at all–they are occluded, obstructed. Occlusion shadows can be present on or inside of forms as well as part of cast shadows. Wherever the light does not reach, you should have occlusion level darkness of tone/value.

Step 6

The last step in how to draw a sphere with light and shadow is to add the reflected or “bounce” light.

Reflected light happens when light from the source bounces off other surfaces and is reflected back onto the object–in this case on its form shadow area.

Basic Light and Shadow Demo 06-add highlight-reflected light

How to determine cast shadow placement

Next, I’ve included a few images to demonstrate how to locate and place the cast shadow for a sphere. Here we’re looking for where the light rays meet the outer contours of the sphere and intersect the ground plane.

How to draw a sphere with light and shadow using pencils (traditional)

Not everyone is interested in working digitally, so I thought it would be helpful to demonstrate how to draw a sphere with light and shadow traditionally as well.

If you’d like to follow along with this demonstration, you’ll need a few pencils. I recommend a blend of the soft and hard leads: 4h, 2h, and h pencils; as well as an hb pencil and a 2b pencil. 4b and 6b pencils will help in the shadow areas. I like to go all the way up to 8b because I love velvety shadows, but usually, 6b is dark enough. I have articles about graphite pencils and drawing tools if you need more information in those areas.

As a rule, I don’t use a blending stump, cotton swab, or cotton ball for this kind of exercise. They smudge more than they blend, so I avoid them.

How to draw a sphere from Imagination!

Here is where those lovely references from the beginning of this article come in handy! While important, sphere drawing on its own isn’t the most exciting exercise. With some imagination and reference, you can create some fun and awesome things from spheres.

How to draw a Sphere, signing off!

Well, this one was quite a few mouthfuls, wasn’t it?

Thank you so much for reading how to draw a sphere and spending some time with me here. I appreciate you hanging in there and I hope you found this helpful and valuable to your artist journey.

I’m always trying to improve and come up with more useful articles to write, so if you have any feedback or questions for me, please reach out to me in the comments below.

Take care, stay safe, and happy drawing!


More how-to-draw articles on CecelyV.com:

How to draw a circle

How to draw a cube

How to draw a mushroom

How to draw a banana

How to draw a pumpkin