How to draw a Donut: Delicious donut drawing made easy for 2024

how to draw a donut

Welcome to my how to draw a donut tutorial!

Hello and welcome to how to draw a donut on cecelyv.com! In this how-to-draw tutorial, we’ll discuss and demonstrate how to make a tasty donut drawing and learn about the shapes, forms, and variations of a donut.

If you’re familiar with any of my other how-to-draw articles–like how to draw a snake or how to draw a mushroom–then you know I like to emphasize form and structure. I’ll cover the basic shapes and forms that help us create a donut drawing, and I’ll explain the distinction between the donut itself and its delicious topping details.

First things first, let’s make sure we understand what we’re drawing a bit more.

Let’s learn about donuts!

A donut (also spelled “doughnut”) is a sweet treat food made from leavened fried dough. Donuts are popular, yummy to taste, and have a world full of variety, with just about every country and culture, from A to Z, having its version.

Donuts are most often deep-fried from a flour dough, with the two most common types of donuts being the ring donut and the filled donut. The ring donut has a circle shape with a hole cut out of the center, and filled donuts are injected with fruit jelly, cream, custard, or other delectable fillings.

Donut toppings vary wildly, from icing and glaze to sprinkles, frosting, chocolate, powdered sugar, cinnamon, and fruit. The hole from the center of a ring donut is often cooked as a donut hole.

Other shapes include twists, balls, buns, and thick and flattened small loaves. Donuts are also divided into cake and yeast-risen types and can be purchased everywhere, from grocery stores to cafes to donut shops and gas station convenience stores.

The History of Donuts

A cookbook published in 1485 gives us the first mention of fried dough cakes (as far as we know), so donuts have been around for quite some time. If you’d like to learn more about the history of the donut, here are a few sources to check out:

How Donuts are made

We like to eat them, and we’re making donut drawings, so we might as well look at how donuts are made, right? It’ll give us another good visual and insight for our drawings, and that’s always a good thing ??.

Time to make some donut drawings!

Okay! You’re probably like, “Finally, she gets to the point!” ??

I know it can seem like a lot of extra stuff, but how can we draw what we don’t understand?

Now, let’s learn how to draw a donut and have some fun!

Exploration and study: Donut drawing shapes and forms

We know enough about donuts and their variations to make some drawings, so let’s start with reference boards and sketches!

If you need help making your reference board, I have an article and a video to help.

Donut reference boards help us sketch!

By studying references, we can develop a good idea of the basic shapes and forms as we begin making sketches and drawings. I like to do this for each of my drawing tutorials. Shapes and forms give us structure, and structure is vital.

How to draw a donut – My exploration and study sketches

It’s essential to do all the study sketches you feel necessary to be comfortable with your subject.

Donuts have relatively simple structures, so most of the drawing work is in the details of toppings like coloring, glaze, icing, sprinkles, shadows, and light, whether you put it on a drawing of a plate or with fruit in the middle, etc.

Here are my study sketches from my how to draw a donut explorations:

Compared with study sketches in my other tutorials, this one is pretty light on drawings–and that’s okay. If the subject is simple, it is easier to understand and draw.

Shape breakouts and variations

By studying my reference boards, I delivered the outlines and edges of an entire list of common donut varieties for us to draw. These outlines and shapes give us the basis for the forms we need as we learn how to draw a donut, and the form provides us with the structure we need so the delicious icing, glaze, and coloring have something to live on top of in our donut drawing.

Next, let’s have some fun with forms by tackling the form construction for each of these shape outlines.

How to draw a donut: basic form construction

To learn how to draw a donut, I started with the most common and recognizable type–the ring donut.

For beginners, I recommend starting with the most basic shapes and forms. Starting from simple shapes will help you grasp each edge, oval, circle, and line as you make your sketch.

This approach works for everyone from kids to hobbyists and professionals and can be applied to any medium from pencil and paper to crayons, colored pencils, or a digital format. Of course, if you need to trace at first to get started, that’s okay too!

Let’s have fun with donut forms!

How to draw a donut – more form construction!

I mentioned earlier that I identified more than one example of common donut shapes. Whether there’s a wavy line, curved lines, or straight lines, each shape gives us an example of how to start building our donut drawing forms.

It’s essential to my mission to emphasize form and structure in all of my drawing tutorials, so I created visual form construction examples for several of the common donut types to help you learn how to draw a donut of any style you choose.

To practice these form construction steps and learn how to draw a donut in different ways, follow the visual form construction steps below!

When in doubt, remember to lead by drawing an entire shape, like an ellipse, circle, oval, etc. It serves us better than individual lines or edges when we have a whole shape.

The twist type is less round than a basic/traditional donut, so I start with a box shape to capture its overall soft boxy form.

The churro is very tubular in its construction, essentially made of one long cylinder.

Learning how to draw a donut that is a cake type is a little more complex, but we can handle it! The cake types tend to be the ones with more complex top forms and toppings, so it makes sense that their form construction is a little more involved.

How to draw a donut step-by-step tutorial (from my sketches & Imagination!)

Next up in how to draw a donut, I will go through the “official” step-by-step tutorial for drawing a basic ring-type donut.

What you saw earlier with all the form construction was essentially a collection of visual step-by-step tutorials. I wanted to make sure I shared multiple ways of how to draw a donut with you so you can choose for yourself which type of donut you want to create.

Follow along with me, and you’ll have a realistic donut picture, complete with a slight indication of shadows. I won’t delve too deeply into the shadows and light or details in this tutorial because that crosses into the realm of painting and rendering, and we need a solid drawing to paint on top of first ?.

This step-by-step should work for kids, too. So let’s get to it!

how to draw a donut_step-by-step tutorial 01

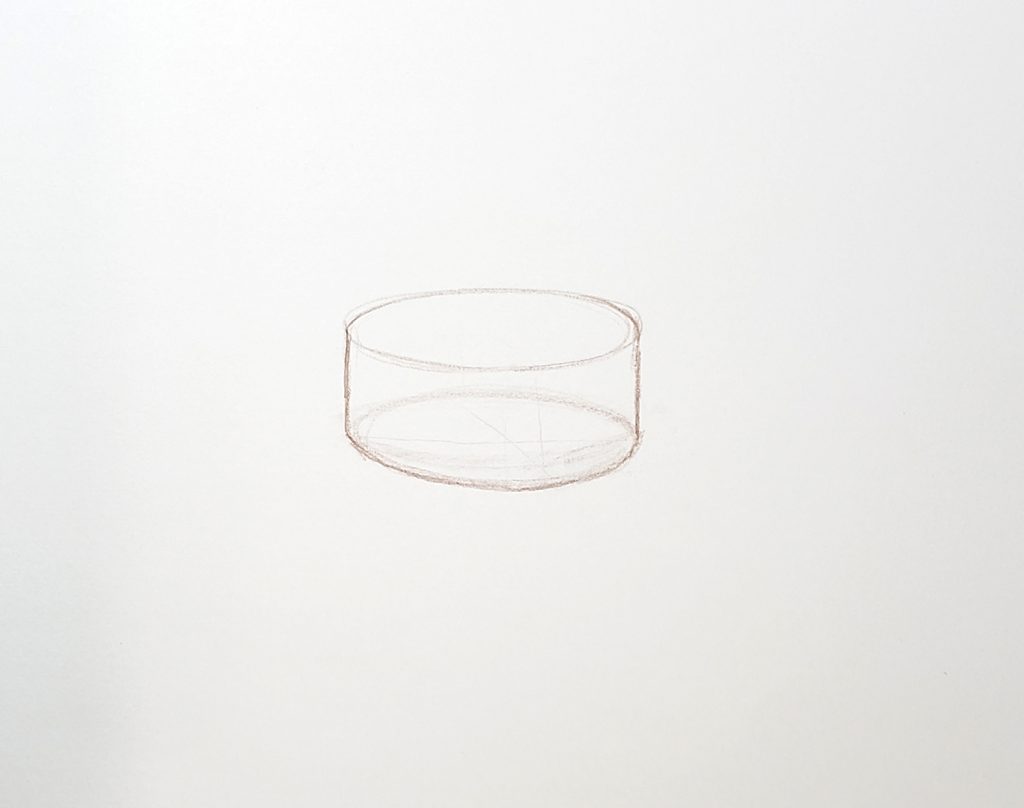
How to draw a donut, Step 1

Start with a horizontal oval, also called an ellipse. Extend two lines straight down from each end of your oval.

Step 2

Connect the straight lines you extended with another oval/ellipse.

You’ve created the form for your donut hole!

how to draw a donut_step-by-step tutorial 02
how to draw a donut_step-by-step tutorial 03

Step 3

Now that we have the empty middle of the donut, it’s time to construct the ring donut itself.

Add two large circles on the horizontal ends of the donut hole form you finished in step 2. Make the circles as large and as round as you’d like.

Step 4

Connect the outside bottom edges of the circles with a large ellipse as shown.

This creates the bottom plane of your donut.

how to draw a donut_step-by-step tutorial 04
how to draw a donut_step-by-step tutorial 05

Step 5

Draw another ellipse to connect the outside top edges of the circles. This creates the top plane of your donut where all the toppings will live.

Step 6

Now, it’s time to erase some of your construction lines to prepare for the next stage of drawing some tasty toppings.

It helps to emphasize the inside edge closest to you in your drawing. When drawn next to your donut hole, it adds a sense of depth and three-dimensionality.

how to draw a donut_step-by-step tutorial 06
how to draw a donut_step-by-step tutorial 07

Step 7

Sketch in some ellipses around the ring of your donut to help you visualize how the form turns.

This will give you a guide to help make your toppings look more realistic.

Step 8

Sketch in the basic shape, size, and directionality of your toppings.

I chose a simple icing with light sprinkles, so here I blocked that in here with a different colored pencil.

how to draw a donut_step-by-step tutorial 08
how to draw a donut_step-by-step tutorial 09

Step 9

To make room for the detail shapes and forms, I took some time to erase my construction lines more carefully.

Step 10

I continued the detail phase’s block-in step here by adding the shapes and forms of each sprinkle.

I made the sprinkles out of tiny circles, 3D curls, and itty bitty cylinders. They may be small, but they still have form and mass!

I also added a little bit of color to the bottom of the donut. Using brown, I decided to make this a chocolate donut with icing and sprinkles on top!

how to draw a donut_step-by-step tutorial 10
how to draw a donut_step-by-step tutorial 11

Step 11

To make the drawing clear, and to keep from accidentally erasing my work during clean-up of my construction lines, I went ahead and did a trace of everything in black marker.

Step 12

The last step is color, shadow, and light!

I didn’t want this how to draw a donut tutorial to turn into a painting tutorial, so I didn’t do much with the light or shadows.

Still a slight indication of shadows under the icing is enough for our purposes here.

how to draw a donut_step-by-step tutorial 12

Congratulations! You’ve completed my how to draw a donut step-by-step tutorial!

The Details and coloring of donuts

Now you know all about how to draw a donut!

I want to offer a little more clarity on what constitutes “details,” so I created a short video to explain (COMING SOON!)

A warm farewell with encouragement

Thank you for visiting my site!

I hope you enjoyed my how to draw a donut tutorial, and I hope you had fun making donut drawings with me!

Remember, it doesn’t matter how many times you need to erase, or whether you need to trace or start again on a new piece of paper several times. It doesn’t matter if your donut drawing is round or if the donut hole you drew is a little wobbly. Learn the process, find your way of drawing. Keep at it! Art isn’t about being “good”, it’s about how making art makes you feel.

Try this with crayons and other media, try it with kids–or other kids if you are a kid!

Have fun and keep drawing! The rest will come.

If you enjoyed my how to draw a donut tutorial, please share it! I’d love to hear your feedback, so if you have a comment or question for me please leave it in the comments section below! If you didn’t like my how to draw a donut tutorial, please tell me that, too! Part of my site mission is to help as many other artists as I can with my content, so I’m open to feedback that helps my content improve.

How to draw a palm tree: Awesome easy-to-use drawing tutorial 2024

How to draw a palm tree_featured image

Welcome to my how to draw a palm tree tutorial!

Hi!

Welcome to another article in my how-to-draw series. This article is all about palm trees and how to draw them! If you want to add more beach and “fun in the sun” feel to the ocean and sand of your art, draw palm trees! A simple palm tree, coconuts, and some tropical fruit can create moods for your drawing that say “vacation and Mai Tais” or “building sandcastles with the kids.”

As you go through this article, you may notice that I’ve changed my format a little bit this time by leaving out the lighting (shadow and light) part. I’ll clarify that choice toward the end here, but, first, let’s focus on learning how to draw a palm tree!

Once you learn to draw a palm tree with all its parts and detail–from the silhouette to the curved lines of the tree trunk, and the round crown to a palm tree’s leaves–you can render your finished drawing however you choose: realistic, cartoon, anime. You’ll be covered by what you learn how to draw here!

First, we explore and study all the shapes and forms that make a palm tree look like a palm tree. Then, we’ll start constructing the basic shapes and forms, move into practicing with palm tree silhouettes, dig into some step-by-step palm tree drawing tutorials, and draw a palm tree in perspective.

I’ll cover the basic shapes, forms, & silhouettes of palm trees and all their parts, including the palm tree trunk and palm tree leaf. Our first step is the same as always: references!

Let’s learn about palm trees!

Palms, including palm trees, are from the family Arecaceae. They are a family of flowering plants with several growth forms, all commonly known as palms.

Most palm species, characterized by large evergreen leaves called fronds, are found in tropical and subtropical environments.

As one of the best known and most cultivated plant families, palms show extensive diversity in physical characteristics that allow them to inhabit nearly every kind of habitat. Being so well cultivated means palms, from their wood to their fruits, have several uses in human society, including palm wood, carnauba wax, palm syrup, dates, oils, jelly, and coconut products.

Exploration and study: Discovering a palm tree’s basic shape

Study sketches help us build our design process. In this step, we must take the time to understand the “thing” we’re drawing. Without this step–or without spending enough time with this step–drawings and designs will likely fall flat.

Since we’re not interested in polishing turds, let’s learn about the shapes and forms that make a palm tree!

Shape breakouts and natural variations

Palm trees have fairly basic overall shapes. To begin an amazing palm tree drawing, choose a few simple shapes and forms.

I started outlining the basic shape breakdowns first because it communicates our goal in this step more clearly. However, it’s important to note that exploration doesn’t start with the shape breakdown sketch you see above; it starts with a messy and thorough exploration of your subject with all its parts and variations.

Here are my exploration study sketches:

First, I explored all the parts of the palm tree: palm leaves, the palm tree trunk, the different directions of the fronds, and individual leaf construction information for several types of palm leaves.

The challenge and complexity arise when it’s time to draw all the details and textures–a lot of small and irregular shape details– that give palm trees that recognizable feel and character.

My hope and encouragement for you are that you don’t forget or skip the exploration drawings stage before jumping straight into the palm tree step by step tutorials coming up.

Trust me, your step-by-step practice will level up much further the more you study palm trees through sketching exploration.

How to draw a palm tree: form construction

Completing our palm tree exploration sketches gave us a decent grasp of the parts of the palm tree. We have a solid idea of the lines, outline, silhouette, and edges that we need to create our own palm tree drawing.

Our study into how to draw a palm tree allowed us to wrap our minds around where we need to be drawing curved lines vs. horizontal lines or a straight line and showed us which basic shapes and forms we have to work with.

As we continue to learn how to draw a palm tree, let’s jump into practicing the tree’s form construction.

The bulk of form construction on a palm tree lies in drawing the trunk while drawing a palm leaf–called a frond–calls for drawing slightly curved planes without much volume apart from the palm frond base.

Most of the trunk is a simple long cylinder, but the portion at the top that resembles a fat cylindrical drum (and sits between the leaves and the trunk) has much more volume and thickness from the forms of dozens and dozens of pruned/shaved fronds.

If you could use more help with drawing forms, please check out my Form in Art and Art Fundamentals for Beginners articles.

A word about research…

Looking up palm tree drawings or palm trees on Google images gives the impression that most palm trees are just long and skinny with a few floppy fronds and a sprinkling of coconuts. This impression is mostly true of young palm trees or palm trees that have been more heavily pruned through shaving.

To learn how to draw a palm tree, I took a look at how trees get that shaved, skinnier look:

Here’s what I see around my neighborhood:

The point I’m trying to make here is: Always do your research and then find the best references you can because a basic search will only get you what everyone else has drawn, and that’s never the whole story of all that’s available for your designs.

Palm tree silhouette

I mentioned at beginning of this tutorial that I’d changed my format a bit for this article, and here’s why:

When you start exploring palm tree drawing (or any tree…or hair…or fur…really any highly textured thing, you get the idea ???), it quickly becomes clear that drawing the leaves of a palm tree one at a time is a huge pain in the butt!

The studies alone that I drew showed me the last thing I wanted to do was draw the fronds one at a time. So, when the shapes are small or many and squished or layered, what tip can we use to save us pulling out our hair? Introducing, Silhouettes!

How to draw a palm tree with silhouette, step-by-step tutorial

There isn’t one right way to draw silhouettes. What I’m showing below is only one way to approach it. Please approach this in the most intuitive way for your drawing process.

Here are a few I drew by hand during my exploration stage.

Drawing with silhouettes helps us visualize our overall subject and its gesture without allowing us to get bogged down in details.

Since most of what we see of trees is their general silhouette and light effects on their shapes and forms (small shapes make textures!), using silhouettes to draw palm trees gets us further along without all the hair-pulling ?.

Once we’ve experimented with a few silhouettes (they should totally be messy, not precious at this stage!) and chosen what we like, we can flesh out the internal shape and form information by drawing over our palm tree silhouette.

Palm tree silhouette draw over, step by step

To do this digitally as I have:

  1. Create a new layer over your silhouette and fill it completely with white, and then lower its opacity until you can clearly see your palm tree drawing silhouette enough to draw and trace over it.
  2. Create another new layer on top of your white trace layer and begin sketching the internal shape information over the top of your silhouette, including texture information.
  3. Use as many layers as you’d like to experiment with as many interior shape designs as you can. Simply hide the layers of your other design iterations to help you focus on the current layer’s work.

If you started traditionally on paper, you can also complete this step by photographing/scanning your drawing for your base palm tree drawing layer and then follow the steps above.

To do this traditionally:

  1. Get some tracing paper and overlay it onto your drawing.
  2. Begin sketching the internal shape information over your drawing onto the tracing paper. I recommend using pencils for this so you can easily make changes as you sketch. It’s also fun and useful to have multiple pieces of tracing paper for trying different interior shape designs.

A light box, if you have one available, is also a useful tool for this step when you’re working traditionally. Here are a couple of options from Blick & Amazon.

I found this to be one of the most interesting and enjoyable steps for how to draw a palm tree, and I encourage you to work loosely and have a blast with it.

Easy steps palm tree drawing

Now, we come to the how to draw a palm tree step by step parts of this tutorial. This is the easiest version of this tutorial. I plan to create a more advanced and involved version in the future.

how to draw a palm tree_step by step-thumbnails

Step 1

Since the planes and lines of a palm tree can get overwhelming quickly, I break the drawing process down into lots of digestible steps.

First, choose the simple shapes you want for your leaves and trunk and create a simple silhouette as shown here.

If you want to add some fruits, like coconuts, now is a good time to add their shapes as well.

Step 2

Next, we begin to construct the forms from our thumbnail.

Here I drew the middle “drum-like” part that sits between the fronds and the trunk.

how to draw a palm tree_step by step 01
how to draw a palm tree_step by step 04

Step 3

Draw the long trunk attached to the “drum-like” part.

Step 4

Draw the overall container or “envelope” shape you want for the palm tree leaves. This step helps you begin blocking in the gesture and direction of your leaves.

how to draw a palm tree_step by step 05
how to draw a palm tree_step by step 06

Step 5

Overlay the palm leaf gesture lines onto your envelope shape. This gesture line step helps you place the tree’s leaves in the position and direction you want them.

Step 6

On top of the gesture lines from the last step, draw your leaf shapes.

how to draw a palm tree_step by step 07
how to draw a palm tree_step by step 08

Step 7

Begin adding texture details to your leaves by using lines to “cut” into the edges/contours of each leaf.

Step 8

Next, I added simplified oval shapes to represent the shaved/pruned fronds on the “drum-like” part of the tree.

More texture adds to the palm tree feel of the drawing.

how to draw a palm tree_step by step 09
how to draw a palm tree_step by step 10

Step 9

Almost done!

Before cleanup, add some texture to the trunk.

The highly textured feel of a palm tree trunk comes from lots of frond leaves that were pruned/shaved as the tree grew.

Final Step

Once you clean up your lines and edges, erasing where there is some overlap of shapes and lines you don’t need, you’ll be all done!

how to draw a palm tree_step by step - Final

Palm tree drawing in Perspective

Knowing how to draw a palm tree in perspective is useful for placing your trees in any scene you want. Below is a quick visual demo for drawing palm trees in two-point perspective.

Color and light and palm trees

I know there’s a lot more to cover to help you understand how to add color and light to a palm tree, but that’s a whole other discussion trust me. I will write another article to cover the color and light area on its own so it’s not confusing ?.

In the meantime, if you’d like to add some light to your tree, please try out my Fundamentals of Light article. It will help you get started with the basics of light and shadow in art.

More details and coloring of palm trees

Without getting into the weeds too much, I thought it would be useful to do a quick visual once over of the textural details palm trees possess.

Here you’ll get an idea of the other textures and some very useful references for your drawing! For quick color experiments, I recommend using colored pencils or pastels.

FULL DISCLOSURE: I do not own these images! I found them on Google Images under the “Creative and Commons” usage rights filter.

Palm tree trunk dissection reference

Palm tree trunk texture reference

Palm fruit reference

Fond wishes and a warm farewell until next time!

I hope you found this to be one of those easy drawing tutorials, and I hope the art and explanations here have helped you digest the more difficult aspects of how to draw palm trees.

Thank you for spending part of your day with me learning how to draw a palm tree! I appreciate you stopping by, and I’d love to hear your feedback. If you have any questions or ideas for improving this article, please leave them for me in the comments below.

Stay safe, and Happy Drawing!