How to draw a snake – Draw dynamic snakes with this easy-to-use tutorial! 2024

How to draw a snake

Welcome to how to draw a snake drawing tutorial!

Thanks for being here!

In this how-to-draw, we’re talking about how to draw a snake!

At first glance, snakes look pretty simple. They don’t have the most complex shapes and forms in their anatomy, but there’s plenty of drawing excitement within the snake species’ natural variations.

To learn how to draw a snake, I’ll share some image references and go through my exploration and study sketching process to demonstrate how studying snake shapes, forms, and anatomy helps you create your own awesome snake drawings.

Next, I’ll cover how to draw a snake step by step, followed by drawing snakes in perspective. Then, we’ll use our references to explore the color and detail varieties in the snake species before sketching some snakes from imagination.

This will be a lot of fun, so I hope you’ll follow along and enjoy learning how to draw a snake with me!

Let’s learn about snakes!

We’ve all seen a snake at some point, right? They’re long, limbless, and covered in scales. They come in a staggering number of color and pattern combinations, and there are about 3,000 species of snakes! Snakes can eat prey much larger than their heads, allowing them to swallow their food whole–unless they’re venomous, in which case it’s fangs out first!

Snakes are found on every continent except Antarctica, and sea snakes are a real thing. ? Yikes!

Thankfully, most snakes possessing venom use it to kill or subdue prey rather than for biting us when we unwittingly scare them, and most snakes aren’t venomous, which is a relief. The nonvenomous snakes swallow their prey alive or squeeze it to death. ?

We’re bigger than snakes…mostly…so, I think we’re okay. I hope ?.

Snakes generally have a negative reputation, but they are wild animals with very sharp fangs and dangerous venom, sooo…I’m gonna say their reputation is deserved.

Still, there is a lot more we can learn about snakes, but for learning how to draw a snake we need to study its shapes, forms, and variations.

Regardless of their hunting and eating habits, snakes are pretty cool and gnarly looking, which makes them fun to draw! Let’s get into our references and start exploring how to draw a snake.

Image reference boards

Each curved line, point, shape, and form we practice in our exploration and study phase adds to our own personal tutorial for learning how to make snake drawings. So, our first step must be to gather references.

I created several reference boards to deliver the information needed to complete your snake drawing. Below you’ll find visual information that will inform you of each step, line, and curve that we need and where they all go proportionally.

You’re welcome to use the reference boards I made, but I encourage you to practice making your own as well. Out of respect, and due to copyright protection, all the references I create for my tutorials are limited to what I can find for free commercial & creative use, create myself, or purchase (which isn’t really a thing on a shoestring budget ?).

For guidance on making your own reference boards, please check out my Art Reference board tutorial.

Snake body reference images

In keeping with best practices, let’s begin with the largest shapes and forms, which, in most cases, means studying the main body of our subject first.

Here in how to draw a snake, we begin with the snake’s body:

Looking at each reference image of a snake body, what are the first things you notice?

The first things I observe are the curved lines of the body, the forked tongue, the mouth and jaw, the body forms and lines, and the extremely wide variation in coloring, patterns, and head shapes.

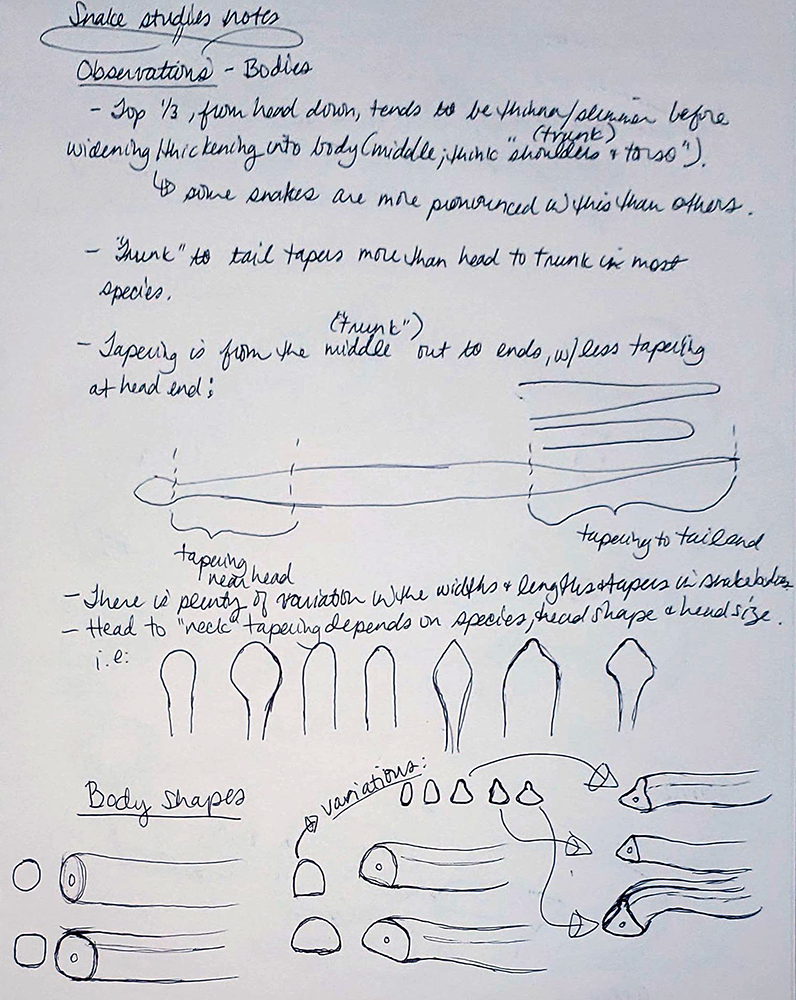
A snake’s body is a simple, tapering cylinder. The way the width, length, and scales vary from head to tail and across snake species is what adds interest, variation, and complexity to the body design.

If you’d like a deeper dive into forms and forms and shapes, check out my Form in Art article. This variation linking across the world of snakes gives us lots of fun shapes to use in snake drawing.

Next, let’s continue learning how to draw a snake by taking a look at the second-largest shape/form on a snake: its head.

Snake head reference images

The head shape, scales, and patterning of a snake hold nearly all the creature’s design interest and variation. In this how to draw a snake tutorial, I’ve intentionally focused more on the head because a snake’s head offers more room to play and invent than its body.

Knowing where most of a subject’s interest lies helps our design. When you make a snake drawing, you’ll know from your study that the head is where you ought to put most of your shape and form details to draw your audience’s attention.

Snake skeleton

A snake’s head and skull give us clues about how its mouth opens and closes, the shape and direction of its scales, and its size. A snake skeleton reference image is useful and necessary in this area.

Even a brief study of snake anatomy is very useful for constructing realistic, chilling snake head designs. Understanding a bit about a snake’s bone structure helps us ground our snake drawing in reality by connecting the dots between design and believability–and the same can be said about snake fangs, underbelly, and tails.

More snake shapes and forms: fangs, belly, and tail

If we look closely, we can see that snakes often have a completely different look and feel to their belly scales. The departure from the look of the rest of the scales is important to note before you work out the scales part of your design.

It might seem like I’m trying to spam you with each reference image, but studying and exploring from reference and from life will ultimately benefit your snake drawing immensely.

Exploration and study: Snake drawing focused on shape and form

Once you’ve gathered all your references, it’s time to draw from them.

Eventually, you’ll establish your own version of this study and exploration process. I will take you through mine to offer a springboard, so to speak.

Snake head studies

As I mentioned earlier, the head of the snake holds most of the shape and form information. So, for this how to draw a snake tutorial, I decided to focus my studies on the head–especially since the body of a snake is quite easy in comparison (at least, until you get to the scales ?).

Notice that each study includes not only a sketch of the snake head I was referring to on my boards, but also a rough sketch of the overall shape/form envelope. By understanding the larger forms that create and support the head, it becomes much easier to build smaller forms like eyes, horns, scales, etc on top.

Shape breakouts and natural variations

Once I felt comfortable with my understanding of the basic anatomical forms of a snake, I was able to break out the most common natural variations. I complete this step in each tutorial because when we understand what we’re drawing we can draw it much better, and invent from imagination more easily.

How to draw a snake: body form construction

Even though a snake’s body is a simple tapering cylinder, it’s important to practice all the basic forms of our subject and try to understand its variations.

As shown in my shapes breakout sketches, there are some slight natural variations in the cylindrical form of snakes. As I was working out how to draw a snake body, I kept those variations in mind and tried to have some fun with it as well.

Here are a few of my sketches for the snake’s body forms:

The example above should help clarify the process of how to draw a snake body. Even though it’s a simple form, clarification on construction always helps.

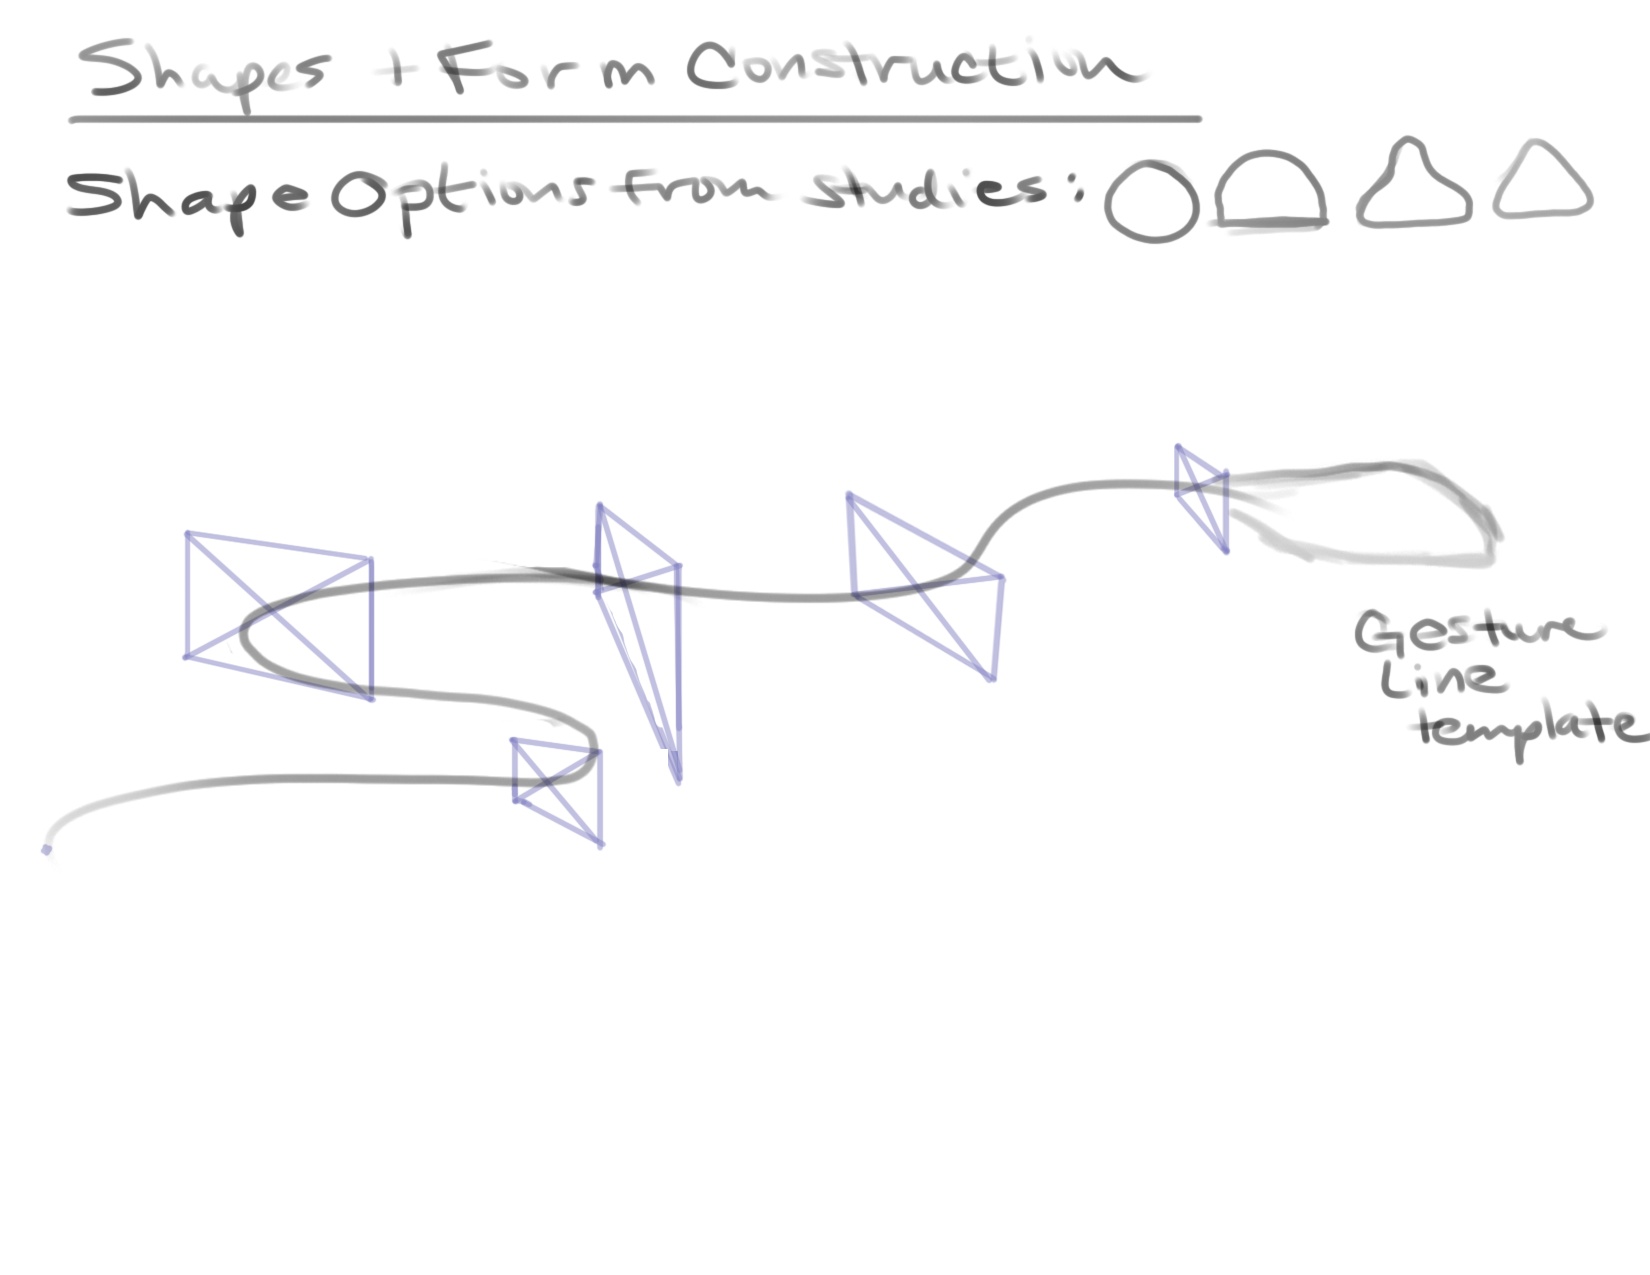
The process for both of these examples was exactly the same. The only difference was my use of different shape language. This second example of how to draw a snake body offers more of a sense of design and detail, and I achieved that simply by tweaking the overall shape used to create the body’s form.

This is something you can do in your design as well, so have fun with it! Try some sharper shapes for a more aggressive-looking snake, or softer ones for a cute-looking snake.

It helps to put your sketches side-by-side for comparison to see how the altered shape language changes your design.

How to draw a snake step-by-step tutorial

Now that we’ve explored each shape and visual bit, we’re snake ready to draw! A bit of an odd turn of phrase, I know, but I had to give it a try. Okay, next up here in how to draw a snake we’ll dive into drawing a snake step by step.

To be clear, this is my own imagination and it’s a finished sketch not a rendered image. I encourage you to follow the process explained within each step. It is not necessary for your snake step by step drawing to look like mine. This how to draw a snake tutorial is for you, so draw your way. Do you and enjoy!

how to draw a snake_step 1

Drawing a snake step 1

I started with a gesture line to define the snake’s pose.

A gesture line gives us a starting-off point by essentially offering us two dots or points for the start and end/top and bottom of our subject.

It’s also a long curve, with a second curve at the end for the tapering tail.

Drawing a snake step 2

After placing the gesture line to indicate the pose, I began building the shapes and forms for the head.

My selection for each line, form, and curve of the head is informed by the lines I remember from my study sketches.

Before you start roughing in the head, decide on its basic shape. It will be most helpful if you drew from your studies and reference boards.

how to draw a snake_step 2
how to draw a snake_step 3

Drawing a snake step 3

In this step, I began filling out the body form.

My goal in this step was to roughly match the thickness and length of the body to the head forms I’d created.

It’s okay if it’s not quite right immediately. Remember, it’s a sketch to get your ideas out. As you’ll see, I made some adjustments further along in my process.

Drawing a snake step 4

In this step, I decided I need to elongate the main body. The length and detail in the head I’d created needed balancing, so I made adjustments to the body.

I decided not to show the tongue, but I had fun giving my snake a ridge-like nose.

I also continued refining the head forms in this step.

how to draw a snake_step 4
how to draw a snake_step 5

Drawing a snake step 5

This step is about continuing to develop all the forms we drew.

As you can see, there are plenty of places where I erased and redrew my lines to make adjustments and changes.

Remember, it’s a sketch which is basically like a workout–you’re working out the design, the shapes, forms, lines, curves, etc. If you’re not happy with it, start another sketch and keep going!

Drawing a snake step 6

When I reached the point that I was happy with how I’d developed all my forms, I completed my sketch by darkening my final line work.

I do this last step to help make the sketch more readable online, but it’s not a necessary part of the how to draw a snake process.

how to draw a snake_step 6

Snake drawing in Perspective

When we learn how to draw a snake, we need to know how to put it into any perspective our image or story needs.

Next, you’ll find a video covering the process of how to draw a snake in one-point perspective.

The most commonly used perspectives for drawing are one and two-point perspectives, so up next in how to draw a snake I’ll go over the two-point perspective process.

The Details and colors of snakes

While each line and curve helps us define our forms, the world of snakes is very well known for several other features–especially their scales, forked tongue, and patterns.

The scales and patterns are designs unto themselves and so a bit too much to add to this how to draw a snake article (we’re almost done, I promise!). I’ll create a separate article all about drawing scales and designing patterns, but we can still talk a bit about the commonalities in these areas.

Snake scales

Collectively, snake scales are known as snakeskin. Scales serve a variety of functions, which I explore in my article How to draw scales.

The range of variety in scales is amazing, going from these:

…all the way to this:

The image above is from a Dragon Snake. Isn’t that one of the most gnarly things you’ve ever seen?! It impressed me anyway ?. This volume of possibility, and the fact that far more creatures than snakes have scales, means I need to treat How to draw Scales as its own thing.

As I was learning how to draw a snake, I did a research overview of their patterning, and, oh boy! Lots of variation, but without any particular rhyme or reason beyond identifying snake species. This is helpful for us because it means you can design your snake’s skin any way you want ??.

A lot of scientific pigmentation language is involved with explaining snake coloring, and you can find one source for that here. For our how to draw a snake tutorial, we don’t need the science. Snakes present with just about every color there is along with iridescence, so choose whatever color scheme suits you.

How to draw a snake from Imagination!

Process: Curved lines, shape, form, and drawing through

I mentioned earlier that I chose to focus on snake heads for my demos, so what I have next is a video showing the entire process of me drawing a snake’s head from my imagination. It’s not a cute snake or a particularly good design, but that wasn’t the point ?. The point was to share my thought, creative, and imaginative process with you.

A warm farewell and finishing touches

Congratulations! You drew some fun snakes today! I hope you feel good about the new knowledge and practice you drew from this article.

Snakes really are pretty simple to draw in a basic sense, and I hope this how to draw a snake tutorial helped you with your snake-drawing goals.

I’m always happy to hear from my readers, so pretty please leave your questions and comments for me below. I’d love to hear what you think about this article and answer any questions that may have come up for you.

Stay safe and Happy Drawing!

How to draw a palm tree: Awesome easy-to-use drawing tutorial 2024

How to draw a palm tree_featured image

Welcome to my how to draw a palm tree tutorial!

Hi!

Welcome to another article in my how-to-draw series. This article is all about palm trees and how to draw them! If you want to add more beach and “fun in the sun” feel to the ocean and sand of your art, draw palm trees! A simple palm tree, coconuts, and some tropical fruit can create moods for your drawing that say “vacation and Mai Tais” or “building sandcastles with the kids.”

As you go through this article, you may notice that I’ve changed my format a little bit this time by leaving out the lighting (shadow and light) part. I’ll clarify that choice toward the end here, but, first, let’s focus on learning how to draw a palm tree!

Once you learn to draw a palm tree with all its parts and detail–from the silhouette to the curved lines of the tree trunk, and the round crown to a palm tree’s leaves–you can render your finished drawing however you choose: realistic, cartoon, anime. You’ll be covered by what you learn how to draw here!

First, we explore and study all the shapes and forms that make a palm tree look like a palm tree. Then, we’ll start constructing the basic shapes and forms, move into practicing with palm tree silhouettes, dig into some step-by-step palm tree drawing tutorials, and draw a palm tree in perspective.

I’ll cover the basic shapes, forms, & silhouettes of palm trees and all their parts, including the palm tree trunk and palm tree leaf. Our first step is the same as always: references!

Let’s learn about palm trees!

Palms, including palm trees, are from the family Arecaceae. They are a family of flowering plants with several growth forms, all commonly known as palms.

Most palm species, characterized by large evergreen leaves called fronds, are found in tropical and subtropical environments.

As one of the best known and most cultivated plant families, palms show extensive diversity in physical characteristics that allow them to inhabit nearly every kind of habitat. Being so well cultivated means palms, from their wood to their fruits, have several uses in human society, including palm wood, carnauba wax, palm syrup, dates, oils, jelly, and coconut products.

Exploration and study: Discovering a palm tree’s basic shape

Study sketches help us build our design process. In this step, we must take the time to understand the “thing” we’re drawing. Without this step–or without spending enough time with this step–drawings and designs will likely fall flat.

Since we’re not interested in polishing turds, let’s learn about the shapes and forms that make a palm tree!

Shape breakouts and natural variations

Palm trees have fairly basic overall shapes. To begin an amazing palm tree drawing, choose a few simple shapes and forms.

I started outlining the basic shape breakdowns first because it communicates our goal in this step more clearly. However, it’s important to note that exploration doesn’t start with the shape breakdown sketch you see above; it starts with a messy and thorough exploration of your subject with all its parts and variations.

Here are my exploration study sketches:

First, I explored all the parts of the palm tree: palm leaves, the palm tree trunk, the different directions of the fronds, and individual leaf construction information for several types of palm leaves.

The challenge and complexity arise when it’s time to draw all the details and textures–a lot of small and irregular shape details– that give palm trees that recognizable feel and character.

My hope and encouragement for you are that you don’t forget or skip the exploration drawings stage before jumping straight into the palm tree step by step tutorials coming up.

Trust me, your step-by-step practice will level up much further the more you study palm trees through sketching exploration.

How to draw a palm tree: form construction

Completing our palm tree exploration sketches gave us a decent grasp of the parts of the palm tree. We have a solid idea of the lines, outline, silhouette, and edges that we need to create our own palm tree drawing.

Our study into how to draw a palm tree allowed us to wrap our minds around where we need to be drawing curved lines vs. horizontal lines or a straight line and showed us which basic shapes and forms we have to work with.

As we continue to learn how to draw a palm tree, let’s jump into practicing the tree’s form construction.

The bulk of form construction on a palm tree lies in drawing the trunk while drawing a palm leaf–called a frond–calls for drawing slightly curved planes without much volume apart from the palm frond base.

Most of the trunk is a simple long cylinder, but the portion at the top that resembles a fat cylindrical drum (and sits between the leaves and the trunk) has much more volume and thickness from the forms of dozens and dozens of pruned/shaved fronds.

If you could use more help with drawing forms, please check out my Form in Art and Art Fundamentals for Beginners articles.

A word about research…

Looking up palm tree drawings or palm trees on Google images gives the impression that most palm trees are just long and skinny with a few floppy fronds and a sprinkling of coconuts. This impression is mostly true of young palm trees or palm trees that have been more heavily pruned through shaving.

To learn how to draw a palm tree, I took a look at how trees get that shaved, skinnier look:

Here’s what I see around my neighborhood:

The point I’m trying to make here is: Always do your research and then find the best references you can because a basic search will only get you what everyone else has drawn, and that’s never the whole story of all that’s available for your designs.

Palm tree silhouette

I mentioned at beginning of this tutorial that I’d changed my format a bit for this article, and here’s why:

When you start exploring palm tree drawing (or any tree…or hair…or fur…really any highly textured thing, you get the idea ???), it quickly becomes clear that drawing the leaves of a palm tree one at a time is a huge pain in the butt!

The studies alone that I drew showed me the last thing I wanted to do was draw the fronds one at a time. So, when the shapes are small or many and squished or layered, what tip can we use to save us pulling out our hair? Introducing, Silhouettes!

How to draw a palm tree with silhouette, step-by-step tutorial

There isn’t one right way to draw silhouettes. What I’m showing below is only one way to approach it. Please approach this in the most intuitive way for your drawing process.

Here are a few I drew by hand during my exploration stage.

Drawing with silhouettes helps us visualize our overall subject and its gesture without allowing us to get bogged down in details.

Since most of what we see of trees is their general silhouette and light effects on their shapes and forms (small shapes make textures!), using silhouettes to draw palm trees gets us further along without all the hair-pulling ?.

Once we’ve experimented with a few silhouettes (they should totally be messy, not precious at this stage!) and chosen what we like, we can flesh out the internal shape and form information by drawing over our palm tree silhouette.

Palm tree silhouette draw over, step by step

To do this digitally as I have:

  1. Create a new layer over your silhouette and fill it completely with white, and then lower its opacity until you can clearly see your palm tree drawing silhouette enough to draw and trace over it.
  2. Create another new layer on top of your white trace layer and begin sketching the internal shape information over the top of your silhouette, including texture information.
  3. Use as many layers as you’d like to experiment with as many interior shape designs as you can. Simply hide the layers of your other design iterations to help you focus on the current layer’s work.

If you started traditionally on paper, you can also complete this step by photographing/scanning your drawing for your base palm tree drawing layer and then follow the steps above.

To do this traditionally:

  1. Get some tracing paper and overlay it onto your drawing.
  2. Begin sketching the internal shape information over your drawing onto the tracing paper. I recommend using pencils for this so you can easily make changes as you sketch. It’s also fun and useful to have multiple pieces of tracing paper for trying different interior shape designs.

A light box, if you have one available, is also a useful tool for this step when you’re working traditionally. Here are a couple of options from Blick & Amazon.

I found this to be one of the most interesting and enjoyable steps for how to draw a palm tree, and I encourage you to work loosely and have a blast with it.

Easy steps palm tree drawing

Now, we come to the how to draw a palm tree step by step parts of this tutorial. This is the easiest version of this tutorial. I plan to create a more advanced and involved version in the future.

how to draw a palm tree_step by step-thumbnails

Step 1

Since the planes and lines of a palm tree can get overwhelming quickly, I break the drawing process down into lots of digestible steps.

First, choose the simple shapes you want for your leaves and trunk and create a simple silhouette as shown here.

If you want to add some fruits, like coconuts, now is a good time to add their shapes as well.

Step 2

Next, we begin to construct the forms from our thumbnail.

Here I drew the middle “drum-like” part that sits between the fronds and the trunk.

how to draw a palm tree_step by step 01
how to draw a palm tree_step by step 04

Step 3

Draw the long trunk attached to the “drum-like” part.

Step 4

Draw the overall container or “envelope” shape you want for the palm tree leaves. This step helps you begin blocking in the gesture and direction of your leaves.

how to draw a palm tree_step by step 05
how to draw a palm tree_step by step 06

Step 5

Overlay the palm leaf gesture lines onto your envelope shape. This gesture line step helps you place the tree’s leaves in the position and direction you want them.

Step 6

On top of the gesture lines from the last step, draw your leaf shapes.

how to draw a palm tree_step by step 07
how to draw a palm tree_step by step 08

Step 7

Begin adding texture details to your leaves by using lines to “cut” into the edges/contours of each leaf.

Step 8

Next, I added simplified oval shapes to represent the shaved/pruned fronds on the “drum-like” part of the tree.

More texture adds to the palm tree feel of the drawing.

how to draw a palm tree_step by step 09
how to draw a palm tree_step by step 10

Step 9

Almost done!

Before cleanup, add some texture to the trunk.

The highly textured feel of a palm tree trunk comes from lots of frond leaves that were pruned/shaved as the tree grew.

Final Step

Once you clean up your lines and edges, erasing where there is some overlap of shapes and lines you don’t need, you’ll be all done!

how to draw a palm tree_step by step - Final

Palm tree drawing in Perspective

Knowing how to draw a palm tree in perspective is useful for placing your trees in any scene you want. Below is a quick visual demo for drawing palm trees in two-point perspective.

Color and light and palm trees

I know there’s a lot more to cover to help you understand how to add color and light to a palm tree, but that’s a whole other discussion trust me. I will write another article to cover the color and light area on its own so it’s not confusing ?.

In the meantime, if you’d like to add some light to your tree, please try out my Fundamentals of Light article. It will help you get started with the basics of light and shadow in art.

More details and coloring of palm trees

Without getting into the weeds too much, I thought it would be useful to do a quick visual once over of the textural details palm trees possess.

Here you’ll get an idea of the other textures and some very useful references for your drawing! For quick color experiments, I recommend using colored pencils or pastels.

FULL DISCLOSURE: I do not own these images! I found them on Google Images under the “Creative and Commons” usage rights filter.

Palm tree trunk dissection reference

Palm tree trunk texture reference

Palm fruit reference

Fond wishes and a warm farewell until next time!

I hope you found this to be one of those easy drawing tutorials, and I hope the art and explanations here have helped you digest the more difficult aspects of how to draw palm trees.

Thank you for spending part of your day with me learning how to draw a palm tree! I appreciate you stopping by, and I’d love to hear your feedback. If you have any questions or ideas for improving this article, please leave them for me in the comments below.

Stay safe, and Happy Drawing!


How to draw a cube: A creative and comprehensive look, 2024

How to draw a cube with CecelyV

Welcome to how to draw a cube!

Happy drawing, everyone! I hope you’re all doing well and ready to learn how to draw a cube with me today ? .

Cubes are one of the five basic forms. Drawing cubes freehand and in perspective are important skills to build on your art journey. Every form you need, for anything you want to draw, can be carved out of or built from a cube.

I’ll be demonstrating a few different methods for cube drawing here with step-by-step images and videos. I’ll show you how to draw a cube freehand, as well as cube drawing in perspective.

Learning how to draw a cube is simple and straightforward. It gets challenging when you need to turn them in perspective, but that’s a bridge to cross later ?. For now, let’s take a look at what cubes are.

Let’s learn about cubes!

The most helpful description I found of a cube comes from a website search on Kiddle:

“A cube is a block with all right angles and whose height, width and depth are all the same. A cube is one of the simplest mathematical shapes in space.”

https://kids.kiddle.co/Cube

The main thing to understand is that a cube is a three-dimensional shape, meaning it has Volume. While a square has width and height, it has no depth–no volume. A cube, and all other three-dimensional forms, have width, height, and depth.

The sides of a cube (also called faces) are squares. Each side is connected to the others by straight lines (called edges) and by corners (called vertices). Each of a cube’s corners is at a right angle. A cube has 6 faces, 12 edges, and 8 corners.

If you’re interested in a more mathematical explanation of what a cube is, you can find it here.

You might have heard people refer to all kinds of boxes as 3D cubes, especially when they’re talking about drawing in perspective. Technically, not all boxes are cubes, but for drawing purposes, it really doesn’t matter one way or the other ?.

Exploration and study: Natural and man-made cubes

Interestingly, there aren’t a lot of examples of naturally occurring cubes. Since it’s such a basic visual building block, I thought that was a little surprising, but ??‍♀️. Naturally occurring cubes are found primarily in rock, mineral, and crystal formations, and it’s super easy to find examples of man-made cubes in almost anything.

Here are a couple of reference boards I created to illustrate both natural and man-made cubes.

Shape breakouts and natural variations

Normally, I would make a bunch of exploration and study sketches of my subject and break out all the different shape and form variations. But…cubes are pretty simple, so that’s not really a thing for this drawing tutorial ?.

The shapes on a cube are just squares, and the variation is limited: we’re either drawing a cube or a rectangular “cube” (box). When we learn how to draw a cube, those are our base options. But simple is good, right?

Okay, let’s dig into this how to draw a cube business. I’ll go over a few freehand methods I came up with, and I’ve included a few video demonstrations about drawing cubes/boxes in perspective and showing the drawing process for the methods.

How to draw a cube step-by-step tutorials

I made up names for the freehand cube drawing methods I came up with ?:

  • The basic method
  • Upside-down L’s
  • The Headless stick figure
  • Connect the squares method

The basic method

This way of drawing a cube is one that I learned early on in my art journey. It begins with a simple square shape and builds into a cube by adding depth with additional lines.

how to draw a cube_basic method step 1

The basic method, Step One

For the basic method of how to draw a cube, step 1 is drawing a simple square of any size you’d like.

Step Two

Next, start creating depth by drawing lines out from each corner. This begins to give you the edges of the cube.

(I missed the bottom left corner here, but I’m sure you’ll rock it ?).

how to draw a cube_basic method step 2
how to draw a cube_basic method step 3

Step Three

Begin connecting the edges of the cube you drew in the previous step. The goal here is to create each square face of the cube, so each complete connection should give you a square face.

Step Four

Connect the last edges and vertices, and you will have completed your 3D cube.

how to draw a cube_basic method step 4

Upside-down L’s

This is just a spin on the basic method that allows us to shift our thinking a little bit. Instead of starting with a familiar shape, we begin with an upside-down letter ‘L’. This way we start out thinking in terms of edges and vertices rather than shapes and faces.

how to draw a cube_upside-down L's step 1

Upside-down L’s, Step One

As its name suggests, step 1 is drawing two upside-down capital L’s. Their size and how far you space them apart will determine how your cube looks.

Step Two

Connect the two L’s to complete the first face of your cube.

how to draw a cube_upside-down L's step 2
how to draw a cube_upside-down L's step 3

Step Three

From the two bottom vertices of the square face, draw edges back in space that each run parallel to the tops of the original upside-down L’s, as shown.

Step Four

Begin connecting the ends of each of the edges you added in the previous step to create additional faces for your cube.

In this example, the bottom and left faces were created.

how to draw a cube_upside-down L's step 4
how to draw a cube_upside-down L's step 5

Step Five

Finish connecting the last three vertices to create the last three faces of your cube and voila! You now have a completed freehand cube!

The Headless stick figure

This how to draw a cube method is straightforward like the others. We begin with the back corners of the cube and work our way forward in space until the cube is complete, and starting with a headless stick figure gives us that back corner start as you’ll see in this next demo.

how to draw a cube_headless stick figure step 1

Headless stick figure, Step One

We have five edges and two vertices. If we were to add a circle at the top, we’d have a stick figure. Without the head, we get the back corner of our cube.

Step Two

Connect the “arms” and “legs” of our headless stick figure to get the first two planes of our cube, as seen here.

how to draw a cube_headless stick figure step 2
how to draw a cube_headless stick figure step 3

Step Three

Connect the top two outside corners with straight edges to create the top plane of the cube.

Step Four

Drop an edge down from the front-most corner of the top square plane. This sets us up to complete the last three planes of the cube.

how to draw a cube_headless stick figure step 4
how to draw a cube_headless stick figure step 5

Step Five

Connect the two bottom outside corners to the end of the vertical edge you dropped earlier and boom! You have a completed cube ?.

Connect the squares method

The focus of this how to draw a cube method is connecting corresponding points (vertices) of the squares. This way of drawing cubes is a lot of fun and opens up possibilities for more interesting cubes and boxes.

how to draw a cube_connect squares method step 01

Connect the squares, Step One

Drawn any size square you’d like to begin.

Step Two

Draw a second square with roughly the same dimensions as the first, and consider its position in relation to your first square since you’ll be connecting them.

Here I chose to overlap them slightly to make the connection a little more intuitive.

You’ll notice my second square is a little smaller than my first, and that’s okay. The point is to understand and practice the process.

how to draw a cube_connect squares method step 02
how to draw a cube_connect squares method step 03

Step Three

Choose a square corner to start with and connect it to its matching corner on your second square with a straight line (edge).

Step Four

Continue connecting the matching edges of both squares to each other.

how to draw a cube_connect squares method step 04
how to draw a cube_connect squares method step 05

Step Five

After connecting the last corner, you’ll have a completed freehand cube drawing!

How to draw a cube medley!

To make this how to draw a cube tutorial more clear, I created a couple of videos to demonstrate the process for each method shown above. Establishing our processes in our work is extremely important, and my goal is to make the processes I use as clear as possible to help you decide on your own.

How to draw a cube: 3D cube drawing.
Cube drawing by connecting squares.

How to draw a cube in Perspective

Perspective can get a little hairy and confusing when you try to explain it with words and images alone, so I think the best approach for this particular art fundamental is a video demonstration.

To be clear, I didn’t make this video to explain drawing in perspective point by point, but the setup and process stay the same whenever you’re drawing basic forms in perspective.

How to draw a cube: 3D cubes in perspective.

You may have noticed from the video that I did the entire demo on a 3-point perspective grid–meaning a three vanishing point setup. For practice like this, it doesn’t matter which perspective you use so long as you have each vanishing point you need. I find it helpful to work from a 3-point perspective grid even when I’m not drawing in that perspective because it gives me the option of drawing in three different perspectives without having to change my paper format.

As long as you use the appropriate vanishing point, or points, for the perspective you intend to use on your object/form, then you’re good to go! ??

How to draw a cube: Form dissection

Normally, at this point, I would go over how to draw a cube with a dissection demonstration that dives into interior forms. However, with basic cubes and boxes, which aren’t representing anything specifically, there aren’t any interior forms to explore.

Still, a demonstration on cutting into/cutting away/dissecting the cube form is still helpful and useful, so that’s what this next video shows.

How to draw a cube: 3D cube dissection.

More cube drawing – building other forms

As I mentioned earlier, all manner of forms can be built from or carved out of cubes and boxes. Here are a few simple examples to demonstrate what I mean:

Freehand forms from cubes.

How to light a cube

Rather than get into an entire discussion on the fundamentals of light, I decided to show a few photographic examples of lighting on a cube. With a few simple art supplies and wooden 3D shapes, I photographed some images to use as a visual tutorial for how light falls on a cube.

This first set of images were taken in my make-shift still life box. It’s an old diaper box whose inside I’ve covered with black butcher paper. I cut out a couple of holes on each of the short sides and partially cut away the top so I can control the lighting. The cube in these images was lit with white light from a spotlight.

These next set of images demonstrate the light on a cube from my overhead studio light. It’s a small ceiling fan with a light kit, which essentially functions as a large diffused light source for these examples. Once again, you’ll notice that the shadow gets longer as the cube moves further away from the light–however, the shadows (shading) are different with a different light source. There are multiple shadows because the light source is composed of 3 light bulbs.

This gives us multiple shadows that are also brighter and quite soft.

In this last set of lighting/shading reference images for how to draw a cube, I used a candle–a much smaller, but quite bright, light source–to light the wooden cube. A candle would be a point light source, and it makes for much darker and more crisp shadows.

For some of these, the candle (point light) was low and closer to the cube, while at other times it was positioned above the cube. As usual, the closer the cube is to the light source, the sharper and darker the shadows are.

Here are a couple of examples of how to light a cube and place the cast shadows using a traditional medium, graphite pencils.

How to draw a cube from Imagination!

Let’s practice how to draw a cube from imagination ?.

There isn’t really much to explain or guide you through here. Just grab a pencil and some paper, and let your imagination fly! I chose to draw some everyday objects to keep things simple and clear, but the sky is the limit with cubes. Go for it!

How to draw a cube from imagination – demo.

Happy cube drawing!

Well, that’s everything I have on how to draw a cube for now.

Thank you so much for hanging in there with me! It’s my goal to write for beginners, students, experienced artists, and hobbyists alike on this walk of art life, so I hope you found the content of my cube drawing tutorial helpful.

I truly appreciate the opportunity to be a guide and participant in your artistic journey, and I hope I’ve helped you make your cube drawing pop! I know you have a lot of options when you search the web, so thank you for spending some time on my little side line of the internet ❤. I hope you enjoy your cube drawing!

I’d love to hear from you, so if you have any feedback or questions for me, please leave them in the comments section below!

Take care, stay safe, and happy drawing!


More how-to-draw articles on CecelyV.com:

How to draw a circle

How to draw a sphere

How to draw a mushroom

How to draw a banana

How to draw a pumpkin

How to draw a pumpkin (A full and balanced tutorial for 2024)

How to draw a pumpkin featured image

In this “How to draw…”

Welcome to another “How to draw…” adventure! Today we’ll explore how to draw a pumpkin! There is a lot of variety, and a pumpkin can be more than you’d think. So in this drawing tutorial, please explore and learn with me, step-by-step, how to draw pumpkins and other squash.

First, we’ll take a brief look into what a pumpkin is, so we know something about what we’re drawing, then we’ll dive into exploration and study sketch activities with reference images.

What is a pumpkin?

My interaction with pumpkins happens during the fall, the time of year when we see many a Halloween pumpkin decorating neighborhoods all over the country. But, interestingly, the word “pumpkin” covers much more than a kiddo’s Halloween pumpkin.

A pumpkin is one of many cultivated species of winter squash. Pumpkins are native to North America and are one of the oldest cultivated plants in the world. We tend to think of the pumpkins that are round, smooth, orange ones with a ribbed pattern on their skin and a thick shell housing seeds and pulp.

These familiar pumpkins are part of the Cucurbita pepo cultivar, just one of the five cultivar categories of squash:

Many squash varieties look wildly different from our traditional Halloween pumpkin and are still called “pumpkins,” which gives us artists so much more to work with. ??The word “pumpkin” is interchangeable with the terms “winter squash” and “squash,” including summer squash. Botanically speaking, all pumpkins (even the Halloween ones ?) are winter squash, and all are fruits because they are seed-bearing structures from flowering plants.

The fifth cultivar category, Cucurbita ficifolia, is biochemically different from other cultivars and more closely resembles a melon. While it looks and grows similarly to pumpkins, it is visually more melon-like, so I didn’t include it in this drawing tutorial. However, the process for drawing melons isn’t much different from pumpkins and other squash, so you can still learn how to draw the more melon-like squash with this tutorial if you’d like.

The uses for pumpkins and squash are quite broad, ranging from cooking and eating every part of the pumpkin to pressing its seeds for pumpkin seed oil, decorative and medicinal uses, competitive growing, and other competitive sports such as Pumpkin chunking.

Pumpkins frequently appear in our stories, such as Native American and Irish folklore, as well as in Autumn, Halloween, and horror-themed stories such as The Legend of Sleepy Hollow, The Runaway Pumpkin, and Christopher Pumpkin.

Pumpkin drawing: Understanding structures

We now have a decent idea of what a pumpkin is and what family, friends, kids, and all kinds of people do with them. With our background research done, it’s time to study the shapes and forms of a pumpkin and other squash.

Exploration and study

Our first step in studying a pumpkin is to gather some references and create a reference board. Some search time on Google is the simplest approach, but feel free to use mine if you’d like. The first image on the right here is of the Cucurbita pepo cultivar group. We can see quite a variety of shapes, proportions, surface textures, tones, and colors. For example, we can see spheres, ovoids, smooth textures, bumpy textures, pear-shaped, deeply ribbed, shallow ribs, ridges, and more.

The next group, Cucurbita maxima, includes the same wide variety of features and the unique Turban squash.

Turban squash

In the Cucurbita moschata group, we see squash varieties having more cylindrical, long goose-necked, and super bumpy surface texture qualities. In contrast, the Cucurbita argyrosperma group includes some very tear-drop shaped varieties.

This last reference I created focuses on the stem portion of a pumpkin. When your subject has multiple “parts,” so to speak, it’s helpful to have references for your study of each.

If you have live pumpkins and squash to practice from life, use those! Drawing from life is an essential skill and one of the Art Fundamentals.

Once you’re all set with references, start drawing what you see to get familiar with the natural variety of shapes. It doesn’t matter which reference you start with, and none of your sketches need to be rendered or “finished” in this step. The exploration and study of how to draw a pumpkin are all about seeing the common natural shapes and forms, their variations, and understanding how all the different forms are put together. The best way to train your eye to see these things is to draw what you see.

It’s beneficial and encouraged to begin with the most simple shape you can see for each sketch. We build forms from shapes and lines, after all. If you’re unfamiliar with forms, my Form in Art article goes in-depth on just that.

Time to put pencil to paper! Speaking of paper, I do most of my sketches by hand with a pencil and a sketchbook to keep things simple and clear.

Here are my exploration and study sketches for how to draw a pumpkin:

Normally, I’m not this neat in my sketchbook ?. I clean things up, so it’s nice and clear for you guys, but I rather enjoy making an unholy mess in my sketchbook ?.

You’ll notice that I drew the flat basic shape first to get an idea of the forms I’d need to construct, and then I went about constructing them–but even during construction, I still start with a 2-D shape and build from there. Then, once I have the basic shape, I begin to understand how the form construction needs to go.

For example, with the “traditional” pumpkin I started with at the top left of the first page of my sketches, it was initially challenging to learn to draw the ribbed forms we all recognize pumpkins for. It took some practice to get a feel for that particular how to draw a pumpkin step. Still, after a few sketches, it became clear that I had to 1) understand the shape and form of the “rib” first, and 2) understand how the “ribs” are positioned relative to the overall shape and proportions of the pumpkin.

The “rib” forms are essentially curving upside-down triangles–kind of like a puffy pizza slice wrapped around a sphere. During construction, that translates into wedge or talon-like forms of varying thickness and length wrapped around a sphere or bowl form. Here’s an example of what I mean:

It helps to line up the top and bottom of the “ribs” using ellipses, which is why you see plenty of ellipses, bowls, and circles in my sketches. The exploration and study process is intended to help you see the “bones” of the subject. When we know the primary shapes and variations, we can begin to design and construct with less reliance on our references.

Shape breakouts and natural variations

As I studied how to draw a pumpkin, I found common shapes for drawing any pumpkin or squash are:

  • a circle
  • an oval
  • a rectangle with rounded corners
  • a rounded crescent
  • a teardrop

We can start constructing and combining forms now that we have a shape profile to work from. I like to create a quick reference guide to the primary profiles and variations that I hope you find helpful as you learn to draw a pumpkin.

How to draw a pumpkin_Shape breakouts and natural variations

It’s straightforward when you compare it to the reference images. By studying my ref boards, I’ve paid close attention to what the distinct shapes and shape variations are and then draw each one. Next, it’s time to understand the common forms and construct them.

Construction

Form construction is about beginning to put the pieces of what we studied together. The slideshows below will walk you through a few how to draw a pumpkin construction demos.

How to draw a pumpkin - Step-by-step form construction demo 1

How to draw a pumpkin – Step-by-step form construction demo 1

This example features more of an elongated shape, but that’s okay. We can use whichever shapes we want ???. I always try to begin with a gesture line to add a sense of movement and character. Next, drawing from my reference guide, I add the basic shapes on top of the gesture.

The next step (second slide) is to connect them and then add contour lines (third slide) to add a sense of depth and volume. Lastly, I erase my construction lines and darken my drawing.

How to draw a pumpkin - Form construction demo 2

How to draw a pumpkin – Form construction demo 2

The process for the next demo is the same, and only the shapes are different. Once you understand your subject and the process, you can begin playing with the profile, silhouette, lines, angles, sizes, and proportions until you land on something you’re happy with.

I took this last form construction demo a little further to help segue into form dissection and interior forms in the next section. Like the other slideshow tutorials, the steps are the same, but I have added a couple.

You’ll find that as you add more complexity to your forms, the steps are repeated, and the only thing that changes is the size and nature of the information you’re adding.

We begin with the largest shapes to build the primary and largest forms first, and from there, we repeat the process with the next largest (or medium-sized) ones on top.

How to draw a pumpkin - Form construction demo 3

How to draw a pumpkin – Form construction demo 3

This final how-to draw a pumpkin construction demo gives you a brief look into how the process repeats. After step 3, a simple form has been built, and it’s ready to be added onto.

In steps 4 and 5, I repeat the same steps, adding simple lines and shapes on top of my initial form to add another layer of complexity and interest that gives a better visual description of the pumpkin’s form.

In step 6, I add the contour lines that give me divisions in the form that I can then cut away for step 7, drawing a rough indication of the interior.

Form dissection and interior forms

At this point, we know how to draw a pumpkin! But do we know how to draw a pumpkin on the inside? ?

Not to worry! We still have our trusty ref boards with images that give us an idea about what’s going on with a pumpkin’s interior. I didn’t do a super in-depth rundown of the interior, but the process is still the same as above using the seed interior body information we find in the references.

Here are my examples of form dissection and a little bit of fun with the interiors.

A word about details

All the most fun and interesting things to draw have plenty of details that give them their character and make them look really cool. But, for all that they add, details only make up about twenty percent of your drawing–and they take up about eighty percent of your time.

That’s one of the reasons they should be left for the end.

Plus, no matter whether you’re learning how to draw a pumpkin, a mushroom, or anything else, all details (smaller forms & patterns) sit on top of larger forms that must be worked out first.

I don’t count light and shadow or color as details, and they are each their own thing and deserve dedicated articles to explain and demonstrate what they entail.

For clarification, I’ve included some sketches as an illustration of the difference between primary forms and detail forms.

Pumpkin drawing tutorial: How to draw a pumpkin step-by-step

How to draw a pumpkin_Step by step 01a

Step 1: Thumbnails & Gesture lines.

Start with some small thumbnails, and then, just as before, add a gesture line and shapes.

Thumbnails of the simple shape combinations you want to use offer a helpful roadmap for your form construction. After that, a gesture line (also called a “line of action”) will help add a sense of movement and life.

Remember, you’ve studied pumpkins and squash, so play around and enjoy!

Feel free to follow along and copy my sketches to get started, but I encourage you to take these examples and apply them to any design you want! You’ve got this!

Step 2: Another Gesture line!

It felt necessary to add a second gesture line for the top area.

There are times it feels more dynamic to have an additional gesture armature to build on.

How to draw a pumpkin_Step by step 01b
How to draw a pumpkin_Step by step with callout 01c

Step 3: Add the basic shapes.

These will be the basis for our largest form, the pumpkin’s body.

Compare what we have now to our little thumbnail in the upper lefthand corner, and you’ll see we’re quite close to the idea there.

Step 4: Shape adjustments.

Here I added another circle and ellipse to adjust the overall contour in the front and back of the form.

The green ellipse will add a “rib” bump in the rear that we can see from the front, and the orange circle in front will add more depth.

How to draw a pumpkin_Step by step with callout 01d
How to draw a pumpkin_Step by step with callout 01e

Step 5: More shape adjustments.

I jumped the gun a little bit here and started filling out the stem form? , but we can roll with it!

The orange ellipses show where I added the top and bottom planes, and the green lines in the middle show how I connected them to create the stem.

Step 6: Contour tweaking.

No matter how you start, you can always tweak and adjust things to suit what you want them to look like.

I decided my overall form looked a little too round and soft for my taste, so I decided to use a few divots and curves to create more interesting plane shifts.

How to draw a pumpkin_Step by step with callout 01f
How to draw a pumpkin_Step by step 01g

Step 7: Clean up & darken.

At this point, my sketch felt finished, so I cleaned it up a bit and darkened the lines I wanted to keep in the design.

I didn’t erase all of the construction lines this time. Sometimes, when you’re not adding light and shadow, contour lines, or a lot of detail, leaving light indications of the construction lines can increase the sense of depth.

I decided to make this how to draw a pumpkin article a little more robust since there are so many varieties out there. More variety means more practice! So here is another how to draw a pumpkin step-by-step tutorial!

Step 1: Gesture line!

Don’t worry; I practice what I preach! The thumbnail sketch for this how to draw a pumpkin example is at the top right in the 1st one above. Take a peek; you’ll see ?.

How to draw a pumpkin_Step by step 02a
How to draw a pumpkin_Step by step with callout 02b

Step 2: You know the drill! Add those shapes!

This is still how to draw a pumpkin, and the process goes on like a good beat.

I added the ellipses for the top and bottom planes of the stem and a narrow trapezoid shape to act as an envelope for the shape I’m after.

Step 3: Motto, motto!

Next, I put in circles to continue building the form.

How to draw a pumpkin_Step by step with callout 02c
How to draw a pumpkin_Step by step with callout 02d

Step 4: Building out other forms.

We know there’s a stem, so let’s get it in there!

Step 5: Connect!

How to draw a pumpkin_Step by step with callout 02e
How to draw a pumpkin_Step by step with callout 02f

Step 6: Build more on top.

I added the “ribs” for more form complexity and interest and to bring home the “pumpkin” feel.

Step 7: Contour tweaking.

I wanted to change the overall contour, so I did that here.

How to draw a pumpkin_Step by step with callout 02g
How to draw a pumpkin_Step by step 02i

Step 8: Clean up and darken.

At the risk of OD’ing you on step-by-steps, I created a few that go through the same process with the stem forms.

Don’t worry; I know you’ve got this how to draw a pumpkin stuff down by now. I’ll put the rest in as simple visuals so you can peruse them at your leisure ?.

Another how to draw a pumpkin stem demo–this one is more fun!

One more, and then I promise I’ll be done with the how to draw a pumpkin stem stuff.

How to draw a pumpkin from Imagination

Guess what? Except for the exploration and study sketches, most of the pumpkins from my demos have been drawn from imagination!

I used my references for inspiration, but the rest came from my brain ?. It’s an awesome feeling, and I bet you’re experiencing it, too! You’ve seen the process many times by now, so keep drawing and experimenting!

How to draw a pumpkin in Perspective

I know I’ve drilled this process into you ad nauseam at this point, so I won’t pile on with the more technical practice of Perspective. Instead, I’ve included a visual walkthrough.

Here are some 1-point perspective examples:

Here are some 2-point perspective examples:

How to draw a pumpkin from imagination: Sketching in Perspective.

I drew all these perspective sketches from my imagination. Now, for my 3-point perspective example, I decided to push things a little more fun.

Light and shadow: How to light your pumpkin

Light & shadow, like Perspective, is a whole other conversation on its own. So in my Fundamentals of Light series, I’m covering all the stuff and gubbins of light and shadow (slowly though, cuz it’s huge!)

In the meantime, here’s a lighting demo for the sketch I did above in 3-point perspective.

A word about color

Later…

I did say, “A word.” ?

In all seriousness, I prioritize solid drawing skills before painting and using color because those things must live on a solid drawing with solid forms.

Playing with pumpkin drawings: Exploring shape language and style variations.

Drawing is fun! So have fun and draw some funky pumpkins!

Here are a few of mine. I gave some of them a body, a face, a mouth, a nose–oh, my! I made pumpkin characters and even a cartoon pumpkin or two ?. See? Fun!

Now, you try! ????

How to draw a pumpkin teacher, signing off!

Thank you so much for having the patience and intestinal fortitude to stick with me to the end! I appreciate you spending some of your time with me and my how to draw a pumpkin drawing tutorial. I know it was long, and I hope you’ve found it helpful.

If you have any questions or feedback for me, please feel free to leave them in the comments below. I’d love to hear from you guys, and I hope you’ll join me for another “how to draw” adventure!

Take care of yourselves and happy drawing!


More how-to-draw articles on CecelyV.com:

How to draw a circle

How to draw a cube

How to draw a sphere

How to draw a mushroom

How to draw a banana