

Welcome to my how to draw a circle drawing tutorial!
Hi and Happy drawing to you all! ?
Welcome to my how to draw a circle article!
The first thing to know about a circle is that it’s a tool. Each of the two-dimensional shape tools and lines we learn to recognize and draw as kiddos are the foundation for all other forms, patterns, and designs.
In my Understanding Form in Art article, I go into this concept of shapes and lines as building blocks a bit more.
The most common building blocks for everything we draw are the circle, the square and rectangle, and lines. Most other shapes can be created from these base shapes, similar to how each color can be mixed with the base colors of red, yellow, and blue. The only elements simpler than any of the base shapes are the line and the point (or dot).
Without getting too technical, let’s explore what a circle really is.
Let’s learn about circles!
A circle is a shape whose points are all equally distant from the center.
When points are not equally distant from the center point, you will get something different. This is where we find the main difference between a circle and its team of similarly round shapes: the oval and the ellipse.
Circles have been a known shape since before the start of recorded history, and the study of circles in mathematics helped the development of other disciplines such as geometry, astronomy, and calculus. Thankfully, we don’t need to get into the weeds of circumference, diameter, radius, distance, etc in order to draw circles.
Now, let’s look at some examples of natural and man-made circles.
Exploration and study: Natural & Man-made Circles.
A circle is an easy thing to find. Here are a couple of reference boards I created to demonstrate how prolific circles are in our lives.


Shape breakouts and natural variations (ovals and ellipses!)
Normally at this stage of my how to draw articles I like to cover the explorative study sketches I create, and break out all the naturally occurring variations in shape and form, but…that’s not really a thing with circles ?.
The ways of how to draw a circle are so simple and subtle, and a slight change to any point on a circle brings you into different shape territory. So, let’s all agree that you guys don’t need me to break down or dissect an already simple shape ?. We’ll just agree, as the intelligent and sensible people we are, that circles are circles, and when you stretch them out a bit they become ovals and ellipses.
How to draw a circle step-by-step: Several methods and tutorials
There are several different methods for how to draw a circle. There are a few that I don’t find terribly practical, such as the paper clip, string, and compass methods. Nevertheless, I’ve created or found an example for each method to offer you a variety to choose from.
PSA for this article: I am not teaching you how to draw a perfect circle. Why? Because it’s not practical or necessary. If perfect circles are your goal…this probably isn’t the best drawing tutorial for you. The wonderful search services of Google will get you to content all about ways to draw a perfect circle, but I’m not the one–sorry ?.
Okay, moving right along! Let’s get into my how to draw a circle tutorials! I have come up with several methods of my own, and I will cover a few of the others I’ve come across (like the string, paper clip, compass, and rubber band methods). Each of the methods that I came up with emphasizes how to draw a circle freehand.
In my humble opinion, when you’re sketching and pulling out ideas, it’s cumbersome to need an additional tool for simple shapes. Plus, a sketch isn’t meant to be perfect; it’s a vehicle for your expression and problem solving.
I will now jump off my soapbox and list the methods I’ll be covering for how to draw a circle.
Methods for How to draw a circle
- Square method
- Crosshairs or ‘X’ method
- Parallel lines method (my favorite!)
- Shapes method
- String and paper clip methods, and more!
- Rubber band method
- Compass method
- Rectangle method (for ovals & ellipses)
The Square Method
The square is pretty straightforward and freehand. We use a square as a bounding box to help us learn how to draw a circle. Here are some step-by-step visuals for this learning project.

Square Method, Step 1
Draw a square as your first step. I like to find the middle point on each side of the square and mark it with a line or a spot/dot because it’s helpful in the following steps.
Step 2
Next, begin drawing your circle by connecting those middle points with curving lines/arches, as shown.


Step 3
Once you’re happy with your circle, begin darkening it.
Step 4
Lastly, erase your square leaving only your completed circle.

The Crosshairs or ‘X’ Method
Using crosshairs (like a plus ‘+’) or an ‘X’ to practice how to draw a circle is another super simple method, and it also allows you to vary the size of the circle as much as you like–and still draw freehand!

Crosshairs or ‘X’ Method, Step 1
Begin by drawing a simple plus sign (‘+’) or ‘X’.
Step 2
Next, begin connecting the end points of your ‘+’ or ‘X’ using curved lines/arches.


Step 3
Continue connecting the end points.
Step 4
Complete your circle by connecting the last end point.


Step 5
Erase your crosshairs or ‘X’, leaving your completed circle.
The Parallel Lines Method (my favorite!)
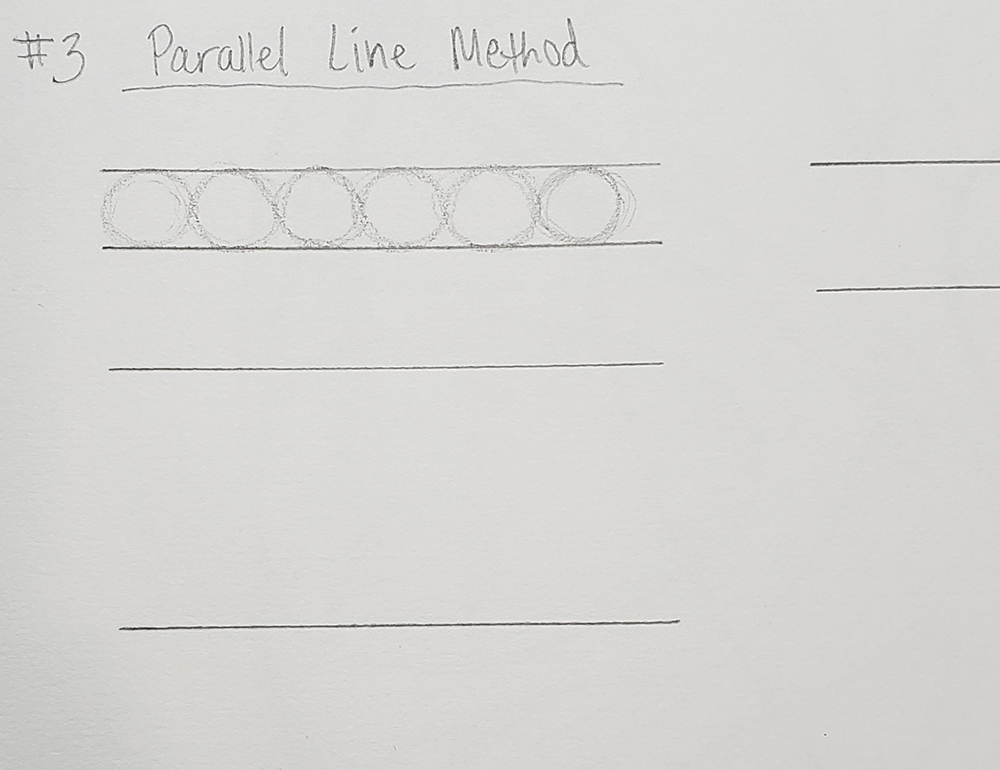
This method is my favorite for line work and circle/ellipse drawing practice. The parallel lines offer just enough support while leaving plenty of freedom for practice and experimentation.

The Parallel Lines Method, Step 1
Begin by drawing a series of straight parallel lines with a ruler, as shown. Varying the distance between the lines helps you practice drawing circles, ovals, and ellipses of different sizes.
Step 2
The parallel lines act as guides for placement of the top and bottom of your circles/ovals/ellipses.
Staying within the lines, freehand draw as many circles/ovals/ellipses as you can fit onto each line, as shown.

Step 3
Fill up all your parallel lines with circles, ellipses, and/or ovals. This is excellent line work practice, and a great warm-up exercise.
Here are a few videos to help make this how to draw a circle method more clear:
Shapes method
This is essentially the same concept as the square method. The point is to use your chosen shape as a bounding “box” from which to create your circle. Shapes create a contained space, so most of them lend themselves quite well to circle drawing. The simplest to use are the square and the triangle, but other shapes can be used just as well.

The Shapes Method, Step 1
Draw any shape to create a bounding “box”. Here, I’ve used triangles and trapezoids. It helps to mark the midpoints of each side on all the shapes.
Step 2
Using curving lines/arches, connect the midpoints of each side.


Step 3
Erase your shape bounding “boxes”, leaving only your completed circles.
String & Paper clip methods, and more!
I found a helpful YouTube video from DaveHax that demonstrates several examples of how to draw a circle, so I’ll share it here:
Rubber band method
Here’s a YouTube video from DrawingWithDeeArtist on how to draw a circle using the rubber band method. The idea behind all these “hacks” for drawing circles is to get perfect circles, not freehand circles.
Compass method
This next YouTube video comes from Lorri at Sunshine22854. In it, she’s kind enough to cover how to draw a circle using a compass.
Rectangle method (for ovals & ellipses)
Once again we’re utilizing the bounding box concept for how to draw a circle–we’re just using a longer box to create ovals and ellipses instead of circles.

Rectangle Method, Step 1
Draw rectangles of any width and length you’d like, and mark the center point of each side (or at the corners for angled ellipses).
Step 2
Connect your sight marks with curving lines/arches, as shown.


Step 3
Darken your lines once you’ve achieved the oval/ellipse you want. Here, I also used this method to create a tear drop shape.
Step 4
Erase your bounding boxes, leaving your completed oval/ellipse.

Drawing circles in Perspective
Learning how to draw a circle in perspective involves first learning how to draw planes and boxes in perspective. In this next video, I’ll demonstrate how I set up boxes in 1-point perspective and draw circles on the planes of each box.
Since circles are flat shapes, the process for drawing them in perspective doesn’t change, even when the perspective changes.
Drawing a circle from Imagination!
Drawing circles as part of your line exercises or warm-up is important training that is beneficial to do regularly. Then there are times we just need fun and interesting–and there’re other ways of practicing how to draw a circle.
In these last couple of videos, I demonstrate a few simple ways of practicing circle drawing by adding depth to transform circles into forms/objects, and by dissecting some forms built from simple ellipses and circles.
Thank you!
Thanks for hanging in there with me! I’m sure you came across lots of choices in your search, and I appreciate being the author whose content you chose.
I hope I’ve been able to do my part to help you see another side to drawing circles, and I hope my article has helped your art journey.
I’d love to hear from you, so if you have any feedback or questions for me please leave them in the comments section below. I hope we can meet each other again for another “how to draw” article!
Take care, stay safe, and Happy Drawing! ?


