How to draw a circle: A thorough exploration of a simple and subtle shape 2024

How to draw a circle

Welcome to my how to draw a circle drawing tutorial!

Hi and Happy drawing to you all! ?

Welcome to my how to draw a circle article!

The first thing to know about a circle is that it’s a tool. Each of the two-dimensional shape tools and lines we learn to recognize and draw as kiddos are the foundation for all other forms, patterns, and designs.

In my Understanding Form in Art article, I go into this concept of shapes and lines as building blocks a bit more.

The most common building blocks for everything we draw are the circle, the square and rectangle, and lines. Most other shapes can be created from these base shapes, similar to how each color can be mixed with the base colors of red, yellow, and blue. The only elements simpler than any of the base shapes are the line and the point (or dot).

Without getting too technical, let’s explore what a circle really is.

Let’s learn about circles!

A circle is a shape whose points are all equally distant from the center.

When points are not equally distant from the center point, you will get something different. This is where we find the main difference between a circle and its team of similarly round shapes: the oval and the ellipse.

Circles have been a known shape since before the start of recorded history, and the study of circles in mathematics helped the development of other disciplines such as geometry, astronomy, and calculus. Thankfully, we don’t need to get into the weeds of circumference, diameter, radius, distance, etc in order to draw circles.

Now, let’s look at some examples of natural and man-made circles.

Exploration and study: Natural & Man-made Circles.

A circle is an easy thing to find. Here are a couple of reference boards I created to demonstrate how prolific circles are in our lives.

Shape breakouts and natural variations (ovals and ellipses!)

Normally at this stage of my how to draw articles I like to cover the explorative study sketches I create, and break out all the naturally occurring variations in shape and form, but…that’s not really a thing with circles ?.

The ways of how to draw a circle are so simple and subtle, and a slight change to any point on a circle brings you into different shape territory. So, let’s all agree that you guys don’t need me to break down or dissect an already simple shape ?. We’ll just agree, as the intelligent and sensible people we are, that circles are circles, and when you stretch them out a bit they become ovals and ellipses.

How to draw a circle step-by-step: Several methods and tutorials

There are several different methods for how to draw a circle. There are a few that I don’t find terribly practical, such as the paper clip, string, and compass methods. Nevertheless, I’ve created or found an example for each method to offer you a variety to choose from.

PSA for this article: I am not teaching you how to draw a perfect circle. Why? Because it’s not practical or necessary. If perfect circles are your goal…this probably isn’t the best drawing tutorial for you. The wonderful search services of Google will get you to content all about ways to draw a perfect circle, but I’m not the one–sorry ?.

Okay, moving right along! Let’s get into my how to draw a circle tutorials! I have come up with several methods of my own, and I will cover a few of the others I’ve come across (like the string, paper clip, compass, and rubber band methods). Each of the methods that I came up with emphasizes how to draw a circle freehand.

In my humble opinion, when you’re sketching and pulling out ideas, it’s cumbersome to need an additional tool for simple shapes. Plus, a sketch isn’t meant to be perfect; it’s a vehicle for your expression and problem solving.

I will now jump off my soapbox and list the methods I’ll be covering for how to draw a circle.

Methods for How to draw a circle

  • Square method
  • Crosshairs or ‘X’ method
  • Parallel lines method (my favorite!)
  • Shapes method
  • String and paper clip methods, and more!
  • Rubber band method
  • Compass method
  • Rectangle method (for ovals & ellipses)

The Square Method

The square is pretty straightforward and freehand. We use a square as a bounding box to help us learn how to draw a circle. Here are some step-by-step visuals for this learning project.

how to draw a circle_square method step 1

Square Method, Step 1

Draw a square as your first step. I like to find the middle point on each side of the square and mark it with a line or a spot/dot because it’s helpful in the following steps.

Step 2

Next, begin drawing your circle by connecting those middle points with curving lines/arches, as shown.

how to draw a circle_square method step 2
how to draw a circle_square method step 3

Step 3

Once you’re happy with your circle, begin darkening it.

Step 4

Lastly, erase your square leaving only your completed circle.

how to draw a circle_square method step 4

The Crosshairs or ‘X’ Method

Using crosshairs (like a plus ‘+’) or an ‘X’ to practice how to draw a circle is another super simple method, and it also allows you to vary the size of the circle as much as you like–and still draw freehand!

how to draw a circle_crosshairs or 'x' method step 1

Crosshairs or ‘X’ Method, Step 1

Begin by drawing a simple plus sign (‘+’) or ‘X’.

Step 2

Next, begin connecting the end points of your ‘+’ or ‘X’ using curved lines/arches.

how to draw a circle_crosshairs or 'x' method step 2
how to draw a circle_crosshairs or 'x' method step 3

Step 3

Continue connecting the end points.

Step 4

Complete your circle by connecting the last end point.

how to draw a circle_crosshairs or 'x' method step 4
how to draw a circle_crosshairs or 'x' method step 5

Step 5

Erase your crosshairs or ‘X’, leaving your completed circle.

The Parallel Lines Method (my favorite!)

This method is my favorite for line work and circle/ellipse drawing practice. The parallel lines offer just enough support while leaving plenty of freedom for practice and experimentation.

how to draw a circle_parallel lines method step 1

The Parallel Lines Method, Step 1

Begin by drawing a series of straight parallel lines with a ruler, as shown. Varying the distance between the lines helps you practice drawing circles, ovals, and ellipses of different sizes.

Step 2

The parallel lines act as guides for placement of the top and bottom of your circles/ovals/ellipses.

Staying within the lines, freehand draw as many circles/ovals/ellipses as you can fit onto each line, as shown.
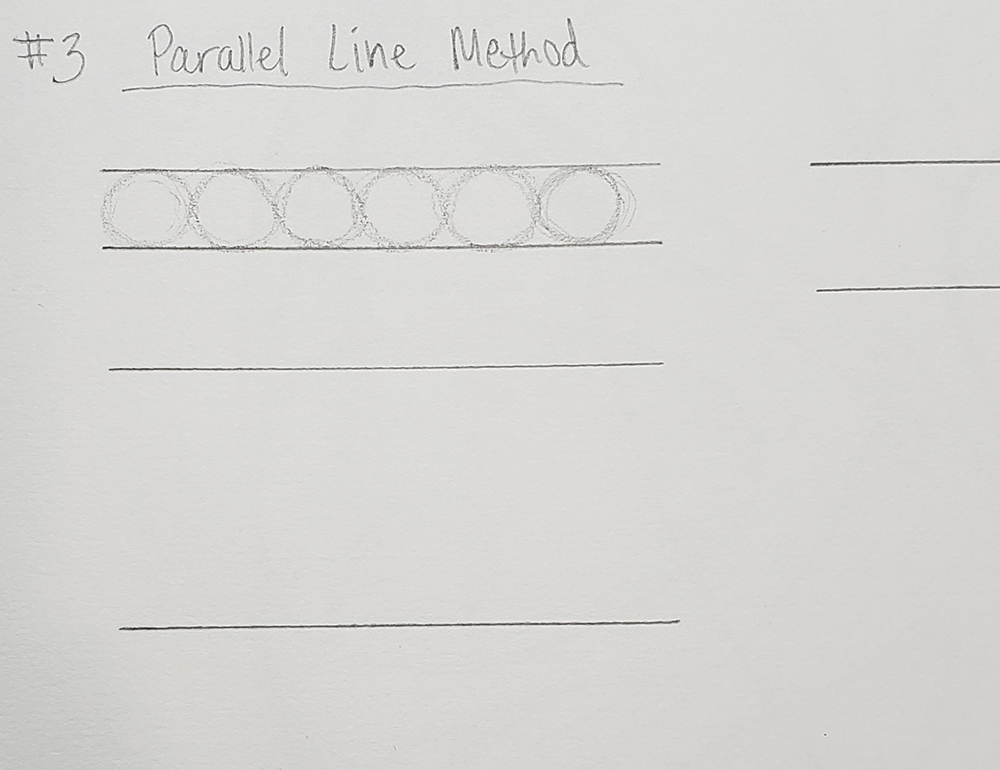
how to draw a circle_parallel lines method step 2
how to draw a circle_parallel lines method step 3

Step 3

Fill up all your parallel lines with circles, ellipses, and/or ovals. This is excellent line work practice, and a great warm-up exercise.

Here are a few videos to help make this how to draw a circle method more clear:

Using my trained right hand ??. A ruler works, but any straight edge will do.
Using my mostly untrained LEFT hand, Eek!
If you have any questions, please leave them in the comments section below or in the comments section of any of my videos!

Shapes method

This is essentially the same concept as the square method. The point is to use your chosen shape as a bounding “box” from which to create your circle. Shapes create a contained space, so most of them lend themselves quite well to circle drawing. The simplest to use are the square and the triangle, but other shapes can be used just as well.

how to draw a circle_shapes method step 1

The Shapes Method, Step 1

Draw any shape to create a bounding “box”. Here, I’ve used triangles and trapezoids. It helps to mark the midpoints of each side on all the shapes.

Step 2

Using curving lines/arches, connect the midpoints of each side.

how to draw a circle_shapes method step 2
how to draw a circle_shapes method step 3

Step 3

Erase your shape bounding “boxes”, leaving only your completed circles.

String & Paper clip methods, and more!

I found a helpful YouTube video from DaveHax that demonstrates several examples of how to draw a circle, so I’ll share it here:

Rubber band method

Here’s a YouTube video from DrawingWithDeeArtist on how to draw a circle using the rubber band method. The idea behind all these “hacks” for drawing circles is to get perfect circles, not freehand circles.

Compass method

This next YouTube video comes from Lorri at Sunshine22854. In it, she’s kind enough to cover how to draw a circle using a compass.

Rectangle method (for ovals & ellipses)

Once again we’re utilizing the bounding box concept for how to draw a circle–we’re just using a longer box to create ovals and ellipses instead of circles.

how to draw a circle_rectangle method step 1

Rectangle Method, Step 1

Draw rectangles of any width and length you’d like, and mark the center point of each side (or at the corners for angled ellipses).

Step 2

Connect your sight marks with curving lines/arches, as shown.

how to draw a circle_rectangle method step 2
how to draw a circle_rectangle method step 3

Step 3

Darken your lines once you’ve achieved the oval/ellipse you want. Here, I also used this method to create a tear drop shape.

Step 4

Erase your bounding boxes, leaving your completed oval/ellipse.

how to draw a circle_rectangle method step 4

Drawing circles in Perspective

Learning how to draw a circle in perspective involves first learning how to draw planes and boxes in perspective. In this next video, I’ll demonstrate how I set up boxes in 1-point perspective and draw circles on the planes of each box.

Since circles are flat shapes, the process for drawing them in perspective doesn’t change, even when the perspective changes.

Drawing a circle from Imagination!

Drawing circles as part of your line exercises or warm-up is important training that is beneficial to do regularly. Then there are times we just need fun and interesting–and there’re other ways of practicing how to draw a circle.

In these last couple of videos, I demonstrate a few simple ways of practicing circle drawing by adding depth to transform circles into forms/objects, and by dissecting some forms built from simple ellipses and circles.

Thank you!

Thanks for hanging in there with me! I’m sure you came across lots of choices in your search, and I appreciate being the author whose content you chose.

I hope I’ve been able to do my part to help you see another side to drawing circles, and I hope my article has helped your art journey.

I’d love to hear from you, so if you have any feedback or questions for me please leave them in the comments section below. I hope we can meet each other again for another “how to draw” article!

Take care, stay safe, and Happy Drawing! ?


More how-to-draw articles on CecelyV.com:

How to draw a cube

How to draw a sphere

How to draw a mushroom

How to draw a banana

How to draw a pumpkin

How to draw a palm tree: Awesome easy-to-use drawing tutorial 2024

How to draw a palm tree_featured image

Welcome to my how to draw a palm tree tutorial!

Hi!

Welcome to another article in my how-to-draw series. This article is all about palm trees and how to draw them! If you want to add more beach and “fun in the sun” feel to the ocean and sand of your art, draw palm trees! A simple palm tree, coconuts, and some tropical fruit can create moods for your drawing that say “vacation and Mai Tais” or “building sandcastles with the kids.”

As you go through this article, you may notice that I’ve changed my format a little bit this time by leaving out the lighting (shadow and light) part. I’ll clarify that choice toward the end here, but, first, let’s focus on learning how to draw a palm tree!

Once you learn to draw a palm tree with all its parts and detail–from the silhouette to the curved lines of the tree trunk, and the round crown to a palm tree’s leaves–you can render your finished drawing however you choose: realistic, cartoon, anime. You’ll be covered by what you learn how to draw here!

First, we explore and study all the shapes and forms that make a palm tree look like a palm tree. Then, we’ll start constructing the basic shapes and forms, move into practicing with palm tree silhouettes, dig into some step-by-step palm tree drawing tutorials, and draw a palm tree in perspective.

I’ll cover the basic shapes, forms, & silhouettes of palm trees and all their parts, including the palm tree trunk and palm tree leaf. Our first step is the same as always: references!

Let’s learn about palm trees!

Palms, including palm trees, are from the family Arecaceae. They are a family of flowering plants with several growth forms, all commonly known as palms.

Most palm species, characterized by large evergreen leaves called fronds, are found in tropical and subtropical environments.

As one of the best known and most cultivated plant families, palms show extensive diversity in physical characteristics that allow them to inhabit nearly every kind of habitat. Being so well cultivated means palms, from their wood to their fruits, have several uses in human society, including palm wood, carnauba wax, palm syrup, dates, oils, jelly, and coconut products.

Exploration and study: Discovering a palm tree’s basic shape

Study sketches help us build our design process. In this step, we must take the time to understand the “thing” we’re drawing. Without this step–or without spending enough time with this step–drawings and designs will likely fall flat.

Since we’re not interested in polishing turds, let’s learn about the shapes and forms that make a palm tree!

Shape breakouts and natural variations

Palm trees have fairly basic overall shapes. To begin an amazing palm tree drawing, choose a few simple shapes and forms.

I started outlining the basic shape breakdowns first because it communicates our goal in this step more clearly. However, it’s important to note that exploration doesn’t start with the shape breakdown sketch you see above; it starts with a messy and thorough exploration of your subject with all its parts and variations.

Here are my exploration study sketches:

First, I explored all the parts of the palm tree: palm leaves, the palm tree trunk, the different directions of the fronds, and individual leaf construction information for several types of palm leaves.

The challenge and complexity arise when it’s time to draw all the details and textures–a lot of small and irregular shape details– that give palm trees that recognizable feel and character.

My hope and encouragement for you are that you don’t forget or skip the exploration drawings stage before jumping straight into the palm tree step by step tutorials coming up.

Trust me, your step-by-step practice will level up much further the more you study palm trees through sketching exploration.

How to draw a palm tree: form construction

Completing our palm tree exploration sketches gave us a decent grasp of the parts of the palm tree. We have a solid idea of the lines, outline, silhouette, and edges that we need to create our own palm tree drawing.

Our study into how to draw a palm tree allowed us to wrap our minds around where we need to be drawing curved lines vs. horizontal lines or a straight line and showed us which basic shapes and forms we have to work with.

As we continue to learn how to draw a palm tree, let’s jump into practicing the tree’s form construction.

The bulk of form construction on a palm tree lies in drawing the trunk while drawing a palm leaf–called a frond–calls for drawing slightly curved planes without much volume apart from the palm frond base.

Most of the trunk is a simple long cylinder, but the portion at the top that resembles a fat cylindrical drum (and sits between the leaves and the trunk) has much more volume and thickness from the forms of dozens and dozens of pruned/shaved fronds.

If you could use more help with drawing forms, please check out my Form in Art and Art Fundamentals for Beginners articles.

A word about research…

Looking up palm tree drawings or palm trees on Google images gives the impression that most palm trees are just long and skinny with a few floppy fronds and a sprinkling of coconuts. This impression is mostly true of young palm trees or palm trees that have been more heavily pruned through shaving.

To learn how to draw a palm tree, I took a look at how trees get that shaved, skinnier look:

Here’s what I see around my neighborhood:

The point I’m trying to make here is: Always do your research and then find the best references you can because a basic search will only get you what everyone else has drawn, and that’s never the whole story of all that’s available for your designs.

Palm tree silhouette

I mentioned at beginning of this tutorial that I’d changed my format a bit for this article, and here’s why:

When you start exploring palm tree drawing (or any tree…or hair…or fur…really any highly textured thing, you get the idea ???), it quickly becomes clear that drawing the leaves of a palm tree one at a time is a huge pain in the butt!

The studies alone that I drew showed me the last thing I wanted to do was draw the fronds one at a time. So, when the shapes are small or many and squished or layered, what tip can we use to save us pulling out our hair? Introducing, Silhouettes!

How to draw a palm tree with silhouette, step-by-step tutorial

There isn’t one right way to draw silhouettes. What I’m showing below is only one way to approach it. Please approach this in the most intuitive way for your drawing process.

Here are a few I drew by hand during my exploration stage.

Drawing with silhouettes helps us visualize our overall subject and its gesture without allowing us to get bogged down in details.

Since most of what we see of trees is their general silhouette and light effects on their shapes and forms (small shapes make textures!), using silhouettes to draw palm trees gets us further along without all the hair-pulling ?.

Once we’ve experimented with a few silhouettes (they should totally be messy, not precious at this stage!) and chosen what we like, we can flesh out the internal shape and form information by drawing over our palm tree silhouette.

Palm tree silhouette draw over, step by step

To do this digitally as I have:

  1. Create a new layer over your silhouette and fill it completely with white, and then lower its opacity until you can clearly see your palm tree drawing silhouette enough to draw and trace over it.
  2. Create another new layer on top of your white trace layer and begin sketching the internal shape information over the top of your silhouette, including texture information.
  3. Use as many layers as you’d like to experiment with as many interior shape designs as you can. Simply hide the layers of your other design iterations to help you focus on the current layer’s work.

If you started traditionally on paper, you can also complete this step by photographing/scanning your drawing for your base palm tree drawing layer and then follow the steps above.

To do this traditionally:

  1. Get some tracing paper and overlay it onto your drawing.
  2. Begin sketching the internal shape information over your drawing onto the tracing paper. I recommend using pencils for this so you can easily make changes as you sketch. It’s also fun and useful to have multiple pieces of tracing paper for trying different interior shape designs.

A light box, if you have one available, is also a useful tool for this step when you’re working traditionally. Here are a couple of options from Blick & Amazon.

I found this to be one of the most interesting and enjoyable steps for how to draw a palm tree, and I encourage you to work loosely and have a blast with it.

Easy steps palm tree drawing

Now, we come to the how to draw a palm tree step by step parts of this tutorial. This is the easiest version of this tutorial. I plan to create a more advanced and involved version in the future.

how to draw a palm tree_step by step-thumbnails

Step 1

Since the planes and lines of a palm tree can get overwhelming quickly, I break the drawing process down into lots of digestible steps.

First, choose the simple shapes you want for your leaves and trunk and create a simple silhouette as shown here.

If you want to add some fruits, like coconuts, now is a good time to add their shapes as well.

Step 2

Next, we begin to construct the forms from our thumbnail.

Here I drew the middle “drum-like” part that sits between the fronds and the trunk.

how to draw a palm tree_step by step 01
how to draw a palm tree_step by step 04

Step 3

Draw the long trunk attached to the “drum-like” part.

Step 4

Draw the overall container or “envelope” shape you want for the palm tree leaves. This step helps you begin blocking in the gesture and direction of your leaves.

how to draw a palm tree_step by step 05
how to draw a palm tree_step by step 06

Step 5

Overlay the palm leaf gesture lines onto your envelope shape. This gesture line step helps you place the tree’s leaves in the position and direction you want them.

Step 6

On top of the gesture lines from the last step, draw your leaf shapes.

how to draw a palm tree_step by step 07
how to draw a palm tree_step by step 08

Step 7

Begin adding texture details to your leaves by using lines to “cut” into the edges/contours of each leaf.

Step 8

Next, I added simplified oval shapes to represent the shaved/pruned fronds on the “drum-like” part of the tree.

More texture adds to the palm tree feel of the drawing.

how to draw a palm tree_step by step 09
how to draw a palm tree_step by step 10

Step 9

Almost done!

Before cleanup, add some texture to the trunk.

The highly textured feel of a palm tree trunk comes from lots of frond leaves that were pruned/shaved as the tree grew.

Final Step

Once you clean up your lines and edges, erasing where there is some overlap of shapes and lines you don’t need, you’ll be all done!

how to draw a palm tree_step by step - Final

Palm tree drawing in Perspective

Knowing how to draw a palm tree in perspective is useful for placing your trees in any scene you want. Below is a quick visual demo for drawing palm trees in two-point perspective.

Color and light and palm trees

I know there’s a lot more to cover to help you understand how to add color and light to a palm tree, but that’s a whole other discussion trust me. I will write another article to cover the color and light area on its own so it’s not confusing ?.

In the meantime, if you’d like to add some light to your tree, please try out my Fundamentals of Light article. It will help you get started with the basics of light and shadow in art.

More details and coloring of palm trees

Without getting into the weeds too much, I thought it would be useful to do a quick visual once over of the textural details palm trees possess.

Here you’ll get an idea of the other textures and some very useful references for your drawing! For quick color experiments, I recommend using colored pencils or pastels.

FULL DISCLOSURE: I do not own these images! I found them on Google Images under the “Creative and Commons” usage rights filter.

Palm tree trunk dissection reference

Palm tree trunk texture reference

Palm fruit reference

Fond wishes and a warm farewell until next time!

I hope you found this to be one of those easy drawing tutorials, and I hope the art and explanations here have helped you digest the more difficult aspects of how to draw palm trees.

Thank you for spending part of your day with me learning how to draw a palm tree! I appreciate you stopping by, and I’d love to hear your feedback. If you have any questions or ideas for improving this article, please leave them for me in the comments below.

Stay safe, and Happy Drawing!


How to draw a basketball: Fantastically fun step-by-step tutorials, 2024

How to draw a basketball

Welcome to my how to draw a basketball tutorial!

Two teams meet with one ball in the middle, and today our focus is on basketball. In this basketball how to draw tutorial, we’ll focus on the ball itself. Its current design is quickly and easily recognizable, with its view of four lines that join at each end of the ball.

First, I’ll go over a little bit of the ball’s evolution because a bit of history is always helpful to our process. Then I’ll show you how to draw a basketball by breaking down its design to demonstrate that those lines we see are three shapes.

I’ll cover how to construct a sphere, the form of a basketball, and then take you one easy step at a time through drawing the shape, form, and curved lines to create your basketball drawing.

Let’s learn about basketballs!

Basketball was invented in 1891 and began with a soccer-like ball, which wasn’t dribbled. Basketball didn’t receive its ball design until 1894, getting a brown four leather-paneled ball with stitching similar to a football. The dribbling technique was introduced into the game in 1897, and by 1937 basketball was popular enough to have its own league, which began as the NBL–The National Basketball League.

With its growing popularity as a sport, basketball needed a redesigned ball because fans had difficulty following a brown ball on a brown court. So, around 1950, the ball was redesigned to be the orange color we’re all familiar with today. Then, in 1971, the NBA redesigned the basketball again, evolving it from four leather panels to eight leather panels which improved players’ ability to grip and dribble the ball.

I’ve included a helpful video I found below. If you’d like to see how the basketball design has changed over the years, and if you’d like to learn more about basketball’s history, click here.

In this drawing tutorial, we’ll focus on how to draw a basketball with its current design.

Exploration and study: Basketball drawing sketching

Whenever I draw something new, I start with study sketches to help me understand my subject’s shapes, forms, lines, and other features. Since this is how to draw a basketball, I did a few sketches to learn what makes a basketball look like it does, and as always, we start with a few references to help us get familiar with basketballs.

Typical basketball features: Curved line and horizontal line

Each curved line on a basketball is part of three shapes. First, it appears to have a vertical and horizontal line bisecting its middle, but they’re vertical and horizontal circular bands around the ball.

How to draw a basketball: form construction

A basketball is a hollow sphere made of eight leather panels. To learn how to draw a basketball, first, we must understand how to draw circles and spheres.

Help with drawing a circle or a sphere can be found here: how to draw a circle and a sphere article.

Here are a couple of videos for a quick recap:

How to draw a circle
How to draw a sphere

Now that we understand the basketball’s sphere form let’s briefly look at its insides with form dissection.

How to draw a basketball: Form dissection

I mentioned earlier that basketballs are hollow. So if you need to draw a deflated or cut open basketball, it helps to practice dissecting a sphere.

Here are some step-by-step images for sphere dissection. In addition, I have more on how to draw a sphere, and here is an example I created for a hollowed-out sphere half.

How to draw a basketball step by step instructions

Now that we’ve covered the essential part of how to draw a basketball, its form, we can move on to the other most recognizable feature: the lines, pattern, and texture.

As mentioned earlier, what appears to be a curved line or a set of lines is three shapes: one verticle circle, one horizontal circle, and one that resembles insect wings or a band-aid.

Drawing a realistic basketball

A simple circle is clear enough to draw, and we covered that in a previous step. Keep in mind that the circles needed for the pattern must go all the way around the ball, create thickness, add depth, and take on much darker shades. The other shape that wraps around the ball and resembles a wing takes more effort and concentration.

I’ve created a video to demonstrate how I draw each from two simple views to clarify this shape.

Basketball drawing step-by-step

Next, I’ve created a set of step-by-step images for how to draw a basketball. It helps to remember that the curved lines that create the shapes and patterns have depth. They are not level with the rest of the ball’s surface but instead make a slight depression. It’s important to indicate this for a realistic basketball drawing.

Drawing a cartoon basketball

Cartoon basketball drawings need to emphasize lines and shapes more because they are the opposite in their execution to a realistic drawing in that they don’t focus on three-dimensional form. Of course, some form will still be indicated because of the way the line will curve around the body of the ball, but overall it will still have the “flat” cartoon look.

For cartoon basketball drawings, it’s also helpful to include an outlining contour and emphasize the orange color and cel-shading method of applying light and shadow. Here are some examples of cartoon basketballs on Google Images and a few step-by-step images for how to draw a basketball in a cartoony way.

The significant difference between how to draw basketball realistically vs. as a cartoon mostly comes down to depth, texture, and handling of light and shadow. The cartoon style starts with a circle, is fun, quick, and purposefully simplifies realism. It lends itself very well to exaggeration and stylization and can be appealing to all ages.

The texture and colors of basketballs

I’m not gonna lie; drawing the texture on basketballs with pencil and paper, even if it’s just a sketch, is a tedious pain in the butt. However, digitally, it’s easy-peasy. If you prefer to learn how to draw a basketball in a hyper-realistic way, you’ll need some texture reference. I’ve included some below and a trace (more imprinting) image to offer a clearer idea of the small shapes that create the ball’s texture.

How to light a basketball

I made a basic lighting example for how to draw a basketball for light and shadow reference with a pencil (graphite) and paper. The ball is drawn the same as in the earlier steps, I just added basic lighting.

Lighting a cartoon basketball with Cel shading

The steps for lighting a cartoon basketball are simple as there’s no need to blend with cel-shading. Using a curved line or two helps create a guide for placing the flat tones that create the cel-shaded look.

Basketball drawing in perspective – start with a sphere!

To learn how to draw a basketball in perspective is the same as drawing a sphere in perspective. As long as you make sure you have a cube rather than a rectangular box in perspective, you’ll get a nice round sphere to start creating your basketball from. After that it’s just a matter of practice, practice, repeat!

Thanks for joining me to learn how to draw a basketball!

Thank you so much for stopping by my how to draw a basketball article! I hope you found this helpful and fun. I’m always happy to hear from my visitors and readers, so if you have any comments, questions, or feedback for me please leave them in the comments section below.

Take care, stay safe, and happy drawing!