

- Welcome to how to draw a snake drawing tutorial!
- Let's learn about snakes!
- Image reference boards
- Exploration and study: Snake drawing focused on shape and form
- How to draw a snake step-by-step tutorial
- Snake drawing in Perspective
- The Details and colors of snakes
- How to draw a snake from Imagination!
- A warm farewell and finishing touches
Welcome to how to draw a snake drawing tutorial!
Thanks for being here!
In this how-to-draw, we’re talking about how to draw a snake!
At first glance, snakes look pretty simple. They don’t have the most complex shapes and forms in their anatomy, but there’s plenty of drawing excitement within the snake species’ natural variations.
To learn how to draw a snake, I’ll share some image references and go through my exploration and study sketching process to demonstrate how studying snake shapes, forms, and anatomy helps you create your own awesome snake drawings.
Next, I’ll cover how to draw a snake step by step, followed by drawing snakes in perspective. Then, we’ll use our references to explore the color and detail varieties in the snake species before sketching some snakes from imagination.
This will be a lot of fun, so I hope you’ll follow along and enjoy learning how to draw a snake with me!
Let’s learn about snakes!
We’ve all seen a snake at some point, right? They’re long, limbless, and covered in scales. They come in a staggering number of color and pattern combinations, and there are about 3,000 species of snakes! Snakes can eat prey much larger than their heads, allowing them to swallow their food whole–unless they’re venomous, in which case it’s fangs out first!
Snakes are found on every continent except Antarctica, and sea snakes are a real thing. ? Yikes!
Thankfully, most snakes possessing venom use it to kill or subdue prey rather than for biting us when we unwittingly scare them, and most snakes aren’t venomous, which is a relief. The nonvenomous snakes swallow their prey alive or squeeze it to death. ?
We’re bigger than snakes…mostly…so, I think we’re okay. I hope ?.
Snakes generally have a negative reputation, but they are wild animals with very sharp fangs and dangerous venom, sooo…I’m gonna say their reputation is deserved.
Still, there is a lot more we can learn about snakes, but for learning how to draw a snake we need to study its shapes, forms, and variations.
Regardless of their hunting and eating habits, snakes are pretty cool and gnarly looking, which makes them fun to draw! Let’s get into our references and start exploring how to draw a snake.
Image reference boards
Each curved line, point, shape, and form we practice in our exploration and study phase adds to our own personal tutorial for learning how to make snake drawings. So, our first step must be to gather references.
I created several reference boards to deliver the information needed to complete your snake drawing. Below you’ll find visual information that will inform you of each step, line, and curve that we need and where they all go proportionally.
You’re welcome to use the reference boards I made, but I encourage you to practice making your own as well. Out of respect, and due to copyright protection, all the references I create for my tutorials are limited to what I can find for free commercial & creative use, create myself, or purchase (which isn’t really a thing on a shoestring budget ?).
For guidance on making your own reference boards, please check out my Art Reference board tutorial.
Snake body reference images
In keeping with best practices, let’s begin with the largest shapes and forms, which, in most cases, means studying the main body of our subject first.
Here in how to draw a snake, we begin with the snake’s body:


Looking at each reference image of a snake body, what are the first things you notice?
The first things I observe are the curved lines of the body, the forked tongue, the mouth and jaw, the body forms and lines, and the extremely wide variation in coloring, patterns, and head shapes.
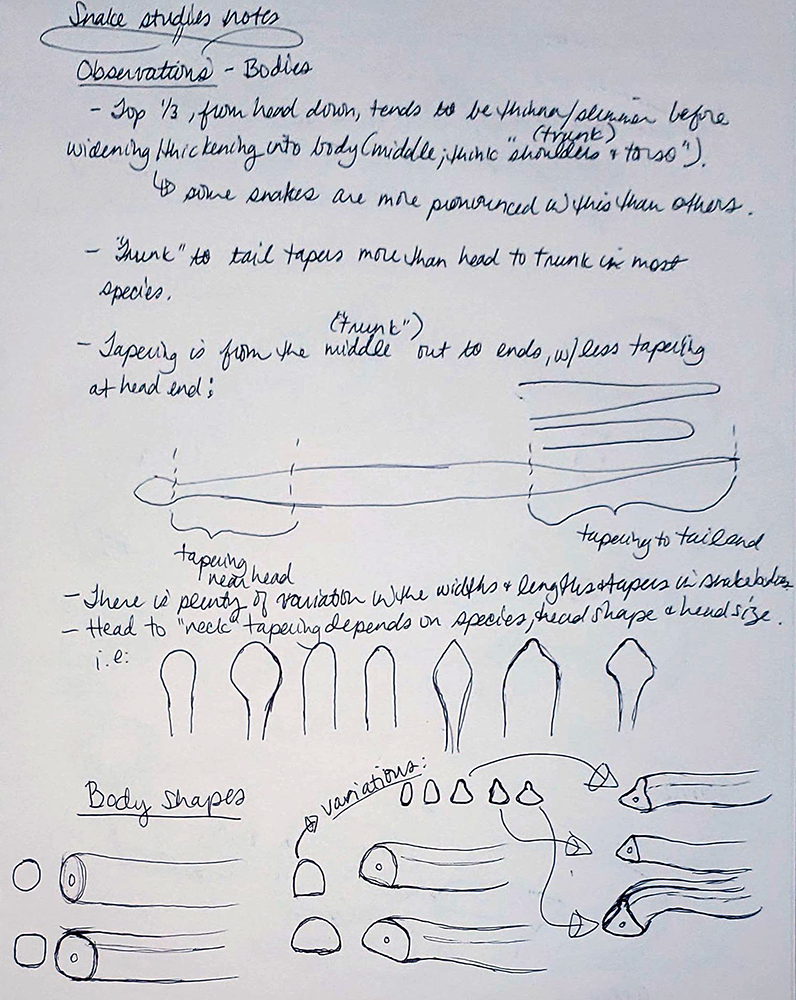
A snake’s body is a simple, tapering cylinder. The way the width, length, and scales vary from head to tail and across snake species is what adds interest, variation, and complexity to the body design.
If you’d like a deeper dive into forms and forms and shapes, check out my Form in Art article. This variation linking across the world of snakes gives us lots of fun shapes to use in snake drawing.
Next, let’s continue learning how to draw a snake by taking a look at the second-largest shape/form on a snake: its head.
Snake head reference images


The head shape, scales, and patterning of a snake hold nearly all the creature’s design interest and variation. In this how to draw a snake tutorial, I’ve intentionally focused more on the head because a snake’s head offers more room to play and invent than its body.
Knowing where most of a subject’s interest lies helps our design. When you make a snake drawing, you’ll know from your study that the head is where you ought to put most of your shape and form details to draw your audience’s attention.
Snake skeleton
A snake’s head and skull give us clues about how its mouth opens and closes, the shape and direction of its scales, and its size. A snake skeleton reference image is useful and necessary in this area.

Even a brief study of snake anatomy is very useful for constructing realistic, chilling snake head designs. Understanding a bit about a snake’s bone structure helps us ground our snake drawing in reality by connecting the dots between design and believability–and the same can be said about snake fangs, underbelly, and tails.
More snake shapes and forms: fangs, belly, and tail


If we look closely, we can see that snakes often have a completely different look and feel to their belly scales. The departure from the look of the rest of the scales is important to note before you work out the scales part of your design.
It might seem like I’m trying to spam you with each reference image, but studying and exploring from reference and from life will ultimately benefit your snake drawing immensely.
Exploration and study: Snake drawing focused on shape and form
Once you’ve gathered all your references, it’s time to draw from them.
Eventually, you’ll establish your own version of this study and exploration process. I will take you through mine to offer a springboard, so to speak.
Snake head studies
As I mentioned earlier, the head of the snake holds most of the shape and form information. So, for this how to draw a snake tutorial, I decided to focus my studies on the head–especially since the body of a snake is quite easy in comparison (at least, until you get to the scales ?).


Notice that each study includes not only a sketch of the snake head I was referring to on my boards, but also a rough sketch of the overall shape/form envelope. By understanding the larger forms that create and support the head, it becomes much easier to build smaller forms like eyes, horns, scales, etc on top.
Shape breakouts and natural variations
Once I felt comfortable with my understanding of the basic anatomical forms of a snake, I was able to break out the most common natural variations. I complete this step in each tutorial because when we understand what we’re drawing we can draw it much better, and invent from imagination more easily.
How to draw a snake: body form construction
Even though a snake’s body is a simple tapering cylinder, it’s important to practice all the basic forms of our subject and try to understand its variations.
As shown in my shapes breakout sketches, there are some slight natural variations in the cylindrical form of snakes. As I was working out how to draw a snake body, I kept those variations in mind and tried to have some fun with it as well.
Here are a few of my sketches for the snake’s body forms:


The example above should help clarify the process of how to draw a snake body. Even though it’s a simple form, clarification on construction always helps.
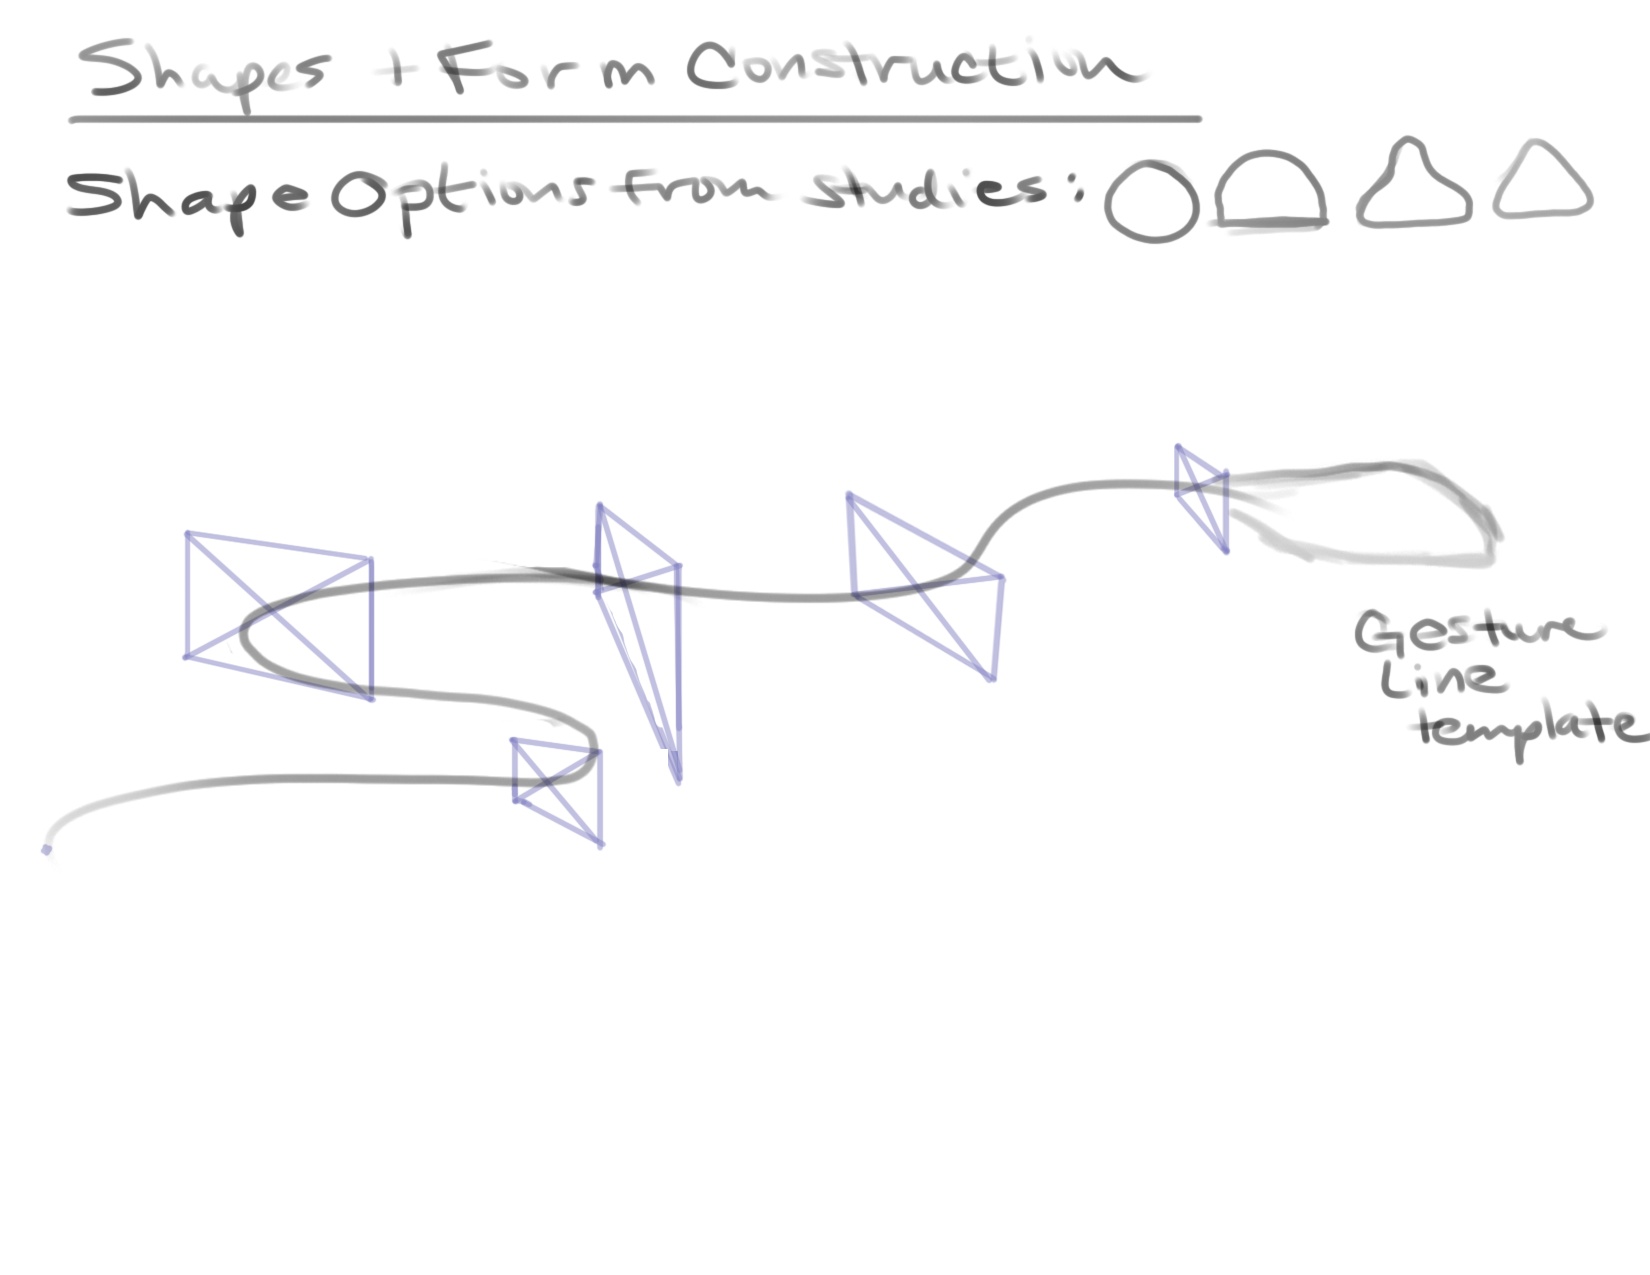


The process for both of these examples was exactly the same. The only difference was my use of different shape language. This second example of how to draw a snake body offers more of a sense of design and detail, and I achieved that simply by tweaking the overall shape used to create the body’s form.
This is something you can do in your design as well, so have fun with it! Try some sharper shapes for a more aggressive-looking snake, or softer ones for a cute-looking snake.
It helps to put your sketches side-by-side for comparison to see how the altered shape language changes your design.

How to draw a snake step-by-step tutorial
Now that we’ve explored each shape and visual bit, we’re snake ready to draw! A bit of an odd turn of phrase, I know, but I had to give it a try. Okay, next up here in how to draw a snake we’ll dive into drawing a snake step by step.
To be clear, this is my own imagination and it’s a finished sketch not a rendered image. I encourage you to follow the process explained within each step. It is not necessary for your snake step by step drawing to look like mine. This how to draw a snake tutorial is for you, so draw your way. Do you and enjoy!

Drawing a snake step 1
I started with a gesture line to define the snake’s pose.
A gesture line gives us a starting-off point by essentially offering us two dots or points for the start and end/top and bottom of our subject.
It’s also a long curve, with a second curve at the end for the tapering tail.
Drawing a snake step 2
After placing the gesture line to indicate the pose, I began building the shapes and forms for the head.
My selection for each line, form, and curve of the head is informed by the lines I remember from my study sketches.
Before you start roughing in the head, decide on its basic shape. It will be most helpful if you drew from your studies and reference boards.


Drawing a snake step 3
In this step, I began filling out the body form.
My goal in this step was to roughly match the thickness and length of the body to the head forms I’d created.
It’s okay if it’s not quite right immediately. Remember, it’s a sketch to get your ideas out. As you’ll see, I made some adjustments further along in my process.
Drawing a snake step 4
In this step, I decided I need to elongate the main body. The length and detail in the head I’d created needed balancing, so I made adjustments to the body.
I decided not to show the tongue, but I had fun giving my snake a ridge-like nose.
I also continued refining the head forms in this step.


Drawing a snake step 5
This step is about continuing to develop all the forms we drew.
As you can see, there are plenty of places where I erased and redrew my lines to make adjustments and changes.
Remember, it’s a sketch which is basically like a workout–you’re working out the design, the shapes, forms, lines, curves, etc. If you’re not happy with it, start another sketch and keep going!
Drawing a snake step 6
When I reached the point that I was happy with how I’d developed all my forms, I completed my sketch by darkening my final line work.
I do this last step to help make the sketch more readable online, but it’s not a necessary part of the how to draw a snake process.

Snake drawing in Perspective
When we learn how to draw a snake, we need to know how to put it into any perspective our image or story needs.
Next, you’ll find a video covering the process of how to draw a snake in one-point perspective.

The most commonly used perspectives for drawing are one and two-point perspectives, so up next in how to draw a snake I’ll go over the two-point perspective process.

The Details and colors of snakes
While each line and curve helps us define our forms, the world of snakes is very well known for several other features–especially their scales, forked tongue, and patterns.
The scales and patterns are designs unto themselves and so a bit too much to add to this how to draw a snake article (we’re almost done, I promise!). I’ll create a separate article all about drawing scales and designing patterns, but we can still talk a bit about the commonalities in these areas.
Snake scales
Collectively, snake scales are known as snakeskin. Scales serve a variety of functions, which I explore in my article How to draw scales.
The range of variety in scales is amazing, going from these:

…all the way to this:

The image above is from a Dragon Snake. Isn’t that one of the most gnarly things you’ve ever seen?! It impressed me anyway ?. This volume of possibility, and the fact that far more creatures than snakes have scales, means I need to treat How to draw Scales as its own thing.
Pattern search
As I was learning how to draw a snake, I did a research overview of their patterning, and, oh boy! Lots of variation, but without any particular rhyme or reason beyond identifying snake species. This is helpful for us because it means you can design your snake’s skin any way you want ??.
Color search
A lot of scientific pigmentation language is involved with explaining snake coloring, and you can find one source for that here. For our how to draw a snake tutorial, we don’t need the science. Snakes present with just about every color there is along with iridescence, so choose whatever color scheme suits you.
How to draw a snake from Imagination!
Process: Curved lines, shape, form, and drawing through
I mentioned earlier that I chose to focus on snake heads for my demos, so what I have next is a video showing the entire process of me drawing a snake’s head from my imagination. It’s not a cute snake or a particularly good design, but that wasn’t the point ?. The point was to share my thought, creative, and imaginative process with you.

A warm farewell and finishing touches
Congratulations! You drew some fun snakes today! I hope you feel good about the new knowledge and practice you drew from this article.
Snakes really are pretty simple to draw in a basic sense, and I hope this how to draw a snake tutorial helped you with your snake-drawing goals.
I’m always happy to hear from my readers, so pretty please leave your questions and comments for me below. I’d love to hear what you think about this article and answer any questions that may have come up for you.
Stay safe and Happy Drawing!


